

If you’re on the hunt for a delightfully indulgent treat that combines the buttery crispness of a classic cookie with a luscious cheesecake center and a burst of fruity jam, look no further. This Mouthwatering Cheesecake Thumbprint Cookies Recipe is an absolute game changer. It’s the kind of cookie that feels like a warm hug and a celebration all in one bite, perfect for sharing with loved ones or savoring all by yourself with a cup of tea or coffee. The balance of textures and flavors is simply irresistible, making these cookies an instant favorite in any kitchen.
Ingredients You’ll Need
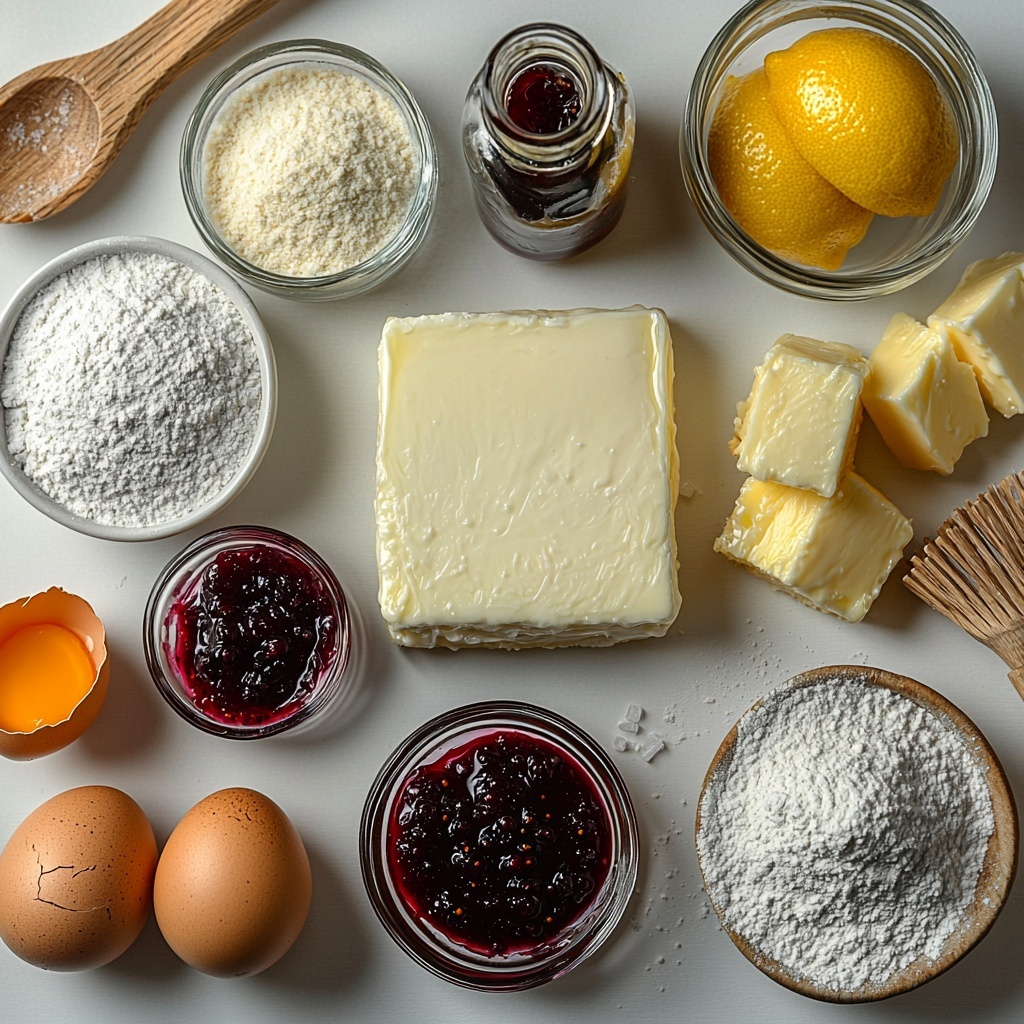
Getting started with this recipe means gathering surprisingly simple ingredients, each playing a crucial role in delivering texture, flavor, and that perfect oven-baked color. From the rich cream cheese that creates the luscious filling to the jam that adds a pop of vibrant sweetness, every component counts.
- Unsalted butter, 1 cup softened: Provides the rich, tender base for the cookie dough and ensures a melt-in-your-mouth texture.
- Granulated sugar, 1/2 cup: Adds sweetness and helps the cookies brown beautifully.
- Light brown sugar, 1/4 cup packed: Contributes subtle caramel notes and moisture to the dough.
- Large egg yolks, 2 room temperature: Bind everything together and add richness without excess moisture.
- Vanilla extract, 2 teaspoons: Infuses the dough and filling with warm, aromatic flavor.
- All-purpose flour, 2 1/2 cups: Forms the sturdy yet tender structure of the cookies.
- Fine salt, 1/2 teaspoon: Enhances all the sweet flavors and balances the richness.
- Cream cheese, 6 ounces softened (brick style, full-fat): The star of the filling, it creates a silky, creamy cheesecake center.
- Powdered sugar, 1/3 cup: Sweetens and smooths the cheesecake filling for that perfect texture.
- Large egg yolk, 1 room temperature: Adds richness to the cheesecake filling, helping it set nicely.
- Vanilla extract, 1 teaspoon: Elevates the cream cheese filling with a lovely aromatic note.
- Fresh lemon juice or lemon zest, 1 teaspoon or 1/2 teaspoon: Brightens the filling with a fresh, tangy contrast.
- Berry jam (raspberry, strawberry, or mixed), 1/3 cup: Adds that perfect sweet and tart finish for each cookie’s thumbprint.
How to Make Mouthwatering Cheesecake Thumbprint Cookies Recipe
Step 1: Cream the Butter and Sugars
Start by beating the softened unsalted butter with both the granulated and light brown sugars until the mixture becomes light, creamy, and slightly fluffy. This step is where the magic begins, ensuring your cookies will have that tender crumb and a bit of airiness that’s so satisfying.
Step 2: Incorporate Egg Yolks and Vanilla
Next, drop in the egg yolks and vanilla extract, mixing thoroughly so every bit of that buttery sweetness is wrapped around these rich flavors. Don’t forget to scrape down the bowl sides, so nothing is left behind and your dough comes together perfectly even.
Step 3: Combine Dry Ingredients and Form Dough
In a separate bowl, whisk the flour with salt to distribute the seasoning evenly. Slowly add this dry mixture to your wet ingredients at low speed, careful not to overmix. You want a dense but soft dough that’s ready to shape without becoming tough.
Step 4: Shape the Dough Balls
Using a tablespoon scoop, portion the dough and roll each into a smooth ball with your palms. This hands-on step is so satisfying, and the rounded shapes are essential for those iconic thumbprint indentations later.
Step 5: Chill the Dough
Pop the dough balls onto parchment-lined trays and chill in the fridge for at least 30 minutes. This chilling firm ups the dough, helping the cookies keep their shape instead of spreading too thin during baking — a little patience that pays off big time!
Step 6: Prepare the Cheesecake Filling
While the dough chills, whip up the cheesecake filling by beating the cream cheese and powdered sugar until silky and smooth. Then add the egg yolk, vanilla, and lemon juice or zest for that bright, creamy flavor that makes these cookies truly special.
Step 7: Create the Thumbprints and Fill
Take one tray of chilled dough and, using your thumb or a small spoon, gently press an indentation in each ball. Then, carefully spoon or pipe the cheesecake filling into each well, filling them just right — not too full to overflow but enough to be scrumptious.
Step 8: Add the Jam Topping
Top each filled thumbprint with a small dollop of your chosen berry jam. If you’re feeling creative, use a toothpick to swirl the jam gently into the cheesecake layer to make a gorgeous marbled effect that’s both beautiful and enticing.
Step 9: Bake to Perfection
Bake the cookies one sheet at a time in a preheated 350°F oven for about 11 to 13 minutes. Keep an eye out for lightly golden edges and set cheesecake centers that still look a little soft — that’s the perfect bake that sets up beautifully once cooled.
Step 10: Cool and Finish
Let the cookies cool on the baking sheet for a few minutes before transferring them to a wire rack. This resting time lets the creamy centers firm up, giving you that unforgettable texture contrast between the crisp cookie and the luscious cheesecake filling.
How to Serve Mouthwatering Cheesecake Thumbprint Cookies Recipe
Garnishes
While these cookies are absolutely divine on their own, a delicate swirl of extra jam drizzled on top before serving adds a touch of inviting color and flavor. For a festive twist, a sprinkle of finely chopped nuts or a light dusting of powdered sugar makes them even more irresistible.
Side Dishes
These cookies shine alongside a rich cup of coffee, a soothing cup of herbal tea, or even a chilled glass of milk. If you’re serving them at a party, pairing them with fresh berries or a cheese platter with mild cheeses creates a wonderful balance of flavors.
Creative Ways to Present
For a standout presentation, arrange the cookies on a tiered dessert tray or serve them in pretty cupcake liners. Another fun idea is to create a cookie platter with assorted jams and allow guests to add their own toppings — this interactive touch adds an element of fun and personalization.
Make Ahead and Storage
Storing Leftovers
These cookies keep best stored in an airtight container in the refrigerator to preserve the cream cheese filling. When you’re ready to enjoy, bringing them to room temperature for about 15 to 20 minutes revives that perfect soft-and-creamy bite.
Freezing
You can freeze these cookies either before baking (shape and thumbprint the dough balls, then freeze on a tray before transferring to a freezer bag) or after baking once cooled. When freezing baked cookies, place parchment paper between layers to prevent sticking and maintain texture.
Reheating
To bring frozen baked cookies back to life, thaw them overnight in the fridge and then warm gently in a low oven (around 300°F) for 5 to 7 minutes. This helps refresh that just-baked softness without melting the cheesecake center too much.
FAQs
Can I use low-fat cream cheese in this recipe?
While low-fat cream cheese is an option, full-fat cream cheese yields a creamier, richer filling that sets beautifully and tastes better. Using full-fat is recommended for that authentic mouthwatering cheesecake flavor in this recipe.
What other types of jam work well for these cookies?
Berry jams like raspberry, strawberry, or mixed berry are classic and delicious, but you can also try apricot, peach, or even a tangy cranberry jam for a fun twist. Just ensure the jam isn’t too runny to avoid soggy cookies.
Is it okay to use frozen dough for this recipe?
Yes! Freezing the dough balls before baking is actually encouraged to help the cookies keep their shape. Just be sure to allow enough time for chilling and baking times might be a minute or two longer when using frozen dough.
Can I make these cookies gluten-free?
You can substitute the all-purpose flour with a gluten-free flour blend designed for baking. Look for a blend with xanthan gum included to help maintain texture, and note that the dough might behave slightly differently, so handle gently.
How long do these cookies stay fresh?
Stored properly in an airtight container in the refrigerator, these cookies stay fresh for up to 5 days. Beyond that, freezing is your best option to maintain flavor and texture.
Final Thoughts
Sharing this Mouthwatering Cheesecake Thumbprint Cookies Recipe feels like sharing a little bit of joy in every bite. The harmony of buttery cookie, smooth cheesecake filling, and vibrant jam topping is something worth baking again and again. Whether it’s for holiday gatherings, a weekend treat, or simply a little moment of sweetness in your day, these cookies promise to deliver smiles every time you make them. So roll up your sleeves, gather the ingredients, and get ready to fall in love with your new favorite cookie!
Print
Mouthwatering Cheesecake Thumbprint Cookies Recipe
- Prep Time: 20 minutes
- Cook Time: 13 minutes
- Total Time: 1 hour 5 minutes
- Yield: 24 cookies
- Category: Dessert, Cookie
- Method: Baking
- Cuisine: American
Description
These Mouthwatering Cheesecake Thumbprint Cookies combine a buttery, tender cookie base with a creamy cheesecake filling and a burst of fruit jam. Perfectly balanced with sweet and tangy flavors, these cookies are chilled before baking to maintain their shape and baked until golden with a luscious, silky cheesecake center. Ideal for dessert lovers looking for a delightful homemade treat.
Ingredients
Cookie Dough
- 1 cup unsalted butter, softened
- 1/2 cup granulated sugar
- 1/4 cup light brown sugar, packed
- 2 large egg yolks, room temperature
- 2 teaspoons vanilla extract
- 2 1/2 cups all-purpose flour
- 1/2 teaspoon fine salt
Cheesecake Filling
- 6 ounces cream cheese, softened (brick style, full-fat)
- 1/3 cup powdered sugar
- 1 large egg yolk, room temperature
- 1 teaspoon vanilla extract
- 1 teaspoon fresh lemon juice or 1/2 teaspoon lemon zest
Topping
- 1/3 cup raspberry, strawberry, or mixed berry jam (or pie filling)
Instructions
- Prepare Baking Sheets: Line two baking sheets with parchment paper and set aside to prevent sticking and ease cookie transfer.
- Make Cookie Dough: In a large mixing bowl, beat the softened unsalted butter, granulated sugar, and light brown sugar on medium speed until light and fluffy, about 2 to 3 minutes. This creates a creamy base for the dough.
- Add Egg Yolks and Vanilla: Mix in the two egg yolks and two teaspoons of vanilla extract until fully combined, scraping the bowl sides to ensure an even mix.
- Incorporate Dry Ingredients: Whisk together the flour and salt in a separate bowl. Gradually add this dry mixture to the wet ingredients on low speed until a soft dough forms, being careful not to overmix to keep the cookies tender.
- Form Dough Balls: Scoop 1-tablespoon portions of dough and roll between palms into smooth balls. Place them spaced on the prepared baking sheets.
- Chill Dough: Refrigerate the dough balls for at least 30 minutes or up to 2 hours to firm up, which helps maintain their shape during baking.
- Make Cheesecake Filling: Beat softened cream cheese and powdered sugar until smooth and creamy. Add egg yolk, vanilla extract, and lemon juice or zest, then beat until thick and silky.
- Create Thumbprints: Preheat oven to 350°F (175°C). Remove one chilled tray. Press a thumb or 1/2 teaspoon back to form indentations in each dough ball, smoothing any cracks gently.
- Fill with Cheesecake: Spoon or pipe cheesecake filling into each indentation, filling near the top without overflowing.
- Add Jam Topping: Add a small dollop of jam atop each cheesecake filling. Optional: use a toothpick to swirl the jam into the cheesecake for a marbled effect.
- Bake Cookies: Bake one sheet at a time for 11 to 13 minutes until edges are lightly golden and cheesecake is set but not browned; centers remain slightly soft.
- Cool Cookies: Let cookies cool on the baking sheet for 5 minutes before transferring to a wire rack to cool completely, allowing cheesecake centers to firm up.
- Serve and Store: Serve cooled cookies as-is or garnish with extra jam swirl. Store leftovers in an airtight container in the refrigerator. Bring to room temperature 15 to 20 minutes before serving for best texture and flavor.
Notes
- Ensure egg yolks and cream cheese are at room temperature to achieve smooth mixtures.
- Chilling the dough is crucial for maintaining cookie shape and preventing spreading during baking.
- If dough cracks when pressing thumbprints, gently smooth edges with fingers to avoid breaks in the cookie.
- Use full-fat cream cheese for best texture and flavor in the cheesecake filling.
- For a different flavor, experiment with other fruit jams or pie fillings.
- Cookies can be stored refrigerated for up to 5 days; warm slightly before serving for softness.


