

If you’re dreaming of a delightful, homemade treat that’s both impressive and surprisingly simple to whip up, this Easy Breakfast Cheese Danish Recipe is your new best friend in the kitchen. Picture flaky, buttery crescent rolls hugging a luscious, creamy filling that’s sweetened just right and topped with a glossy, vanilla glaze—every bite is pure morning magic. Whether you’re hosting a brunch or craving a cozy weekend indulgence, this recipe brings warm smiles and delicious comfort in equal measure.
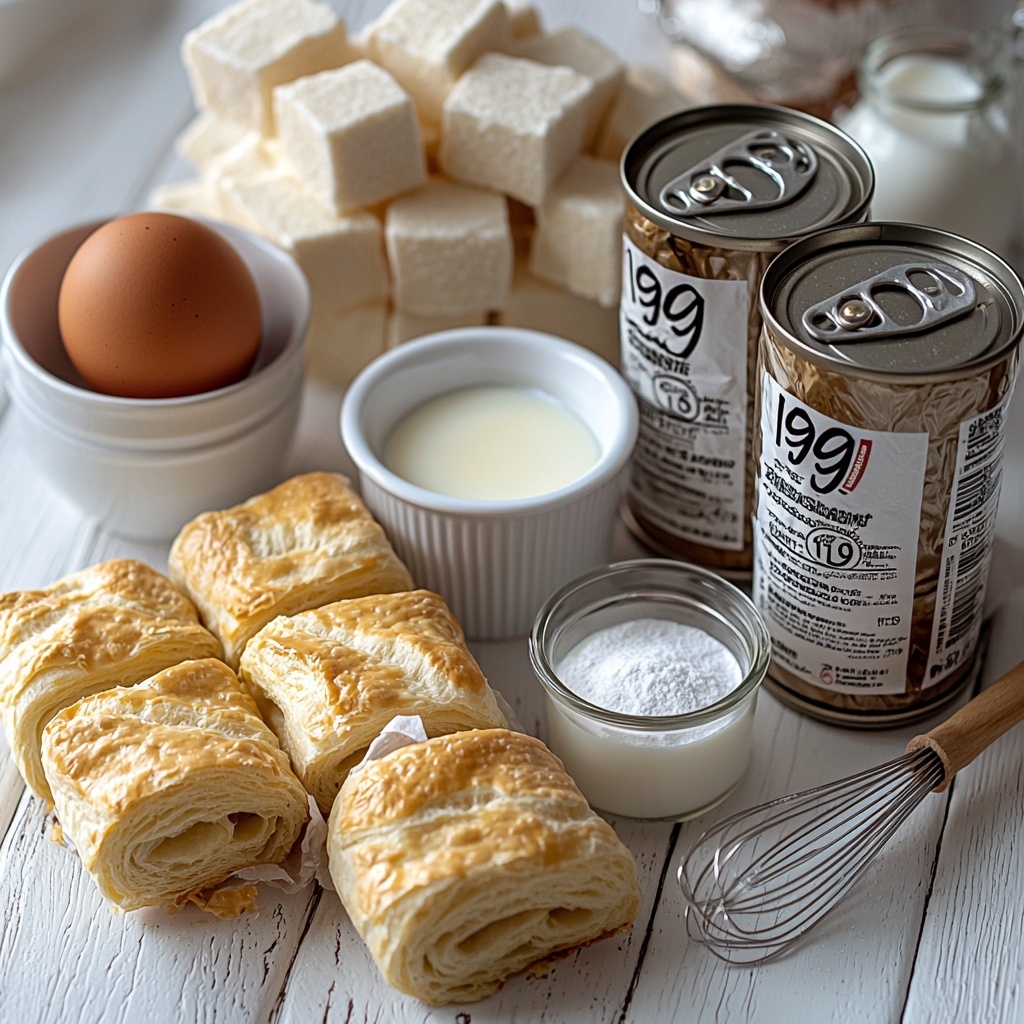
Ingredients You’ll Need
The beauty of this Easy Breakfast Cheese Danish Recipe lies in its simplicity: just a handful of common ingredients that come together effortlessly but create layers of delicious flavor and texture. Each component plays an essential role—from the crescent rolls providing that flaky, golden crust to the cream cheese filling that’s smooth, tangy, and sweetened with vanilla and sugar. The glaze ties everything together with a subtle vanilla sweetness and a perfect shine.
- 2 cans refrigerated crescent rolls: These form the delicate, buttery base and top layer, and using refrigerated dough saves so much prep time without sacrificing flaky texture.
- 2 (8 oz) packages cream cheese: Provides the rich, creamy filling that’s the star of the show, lending a smooth texture and tangy flavor.
- 1 cup sugar: Sweetens the cream cheese filling to balance its richness perfectly.
- 1 teaspoon vanilla extract: Adds warm, aromatic notes to brighten the filling’s flavor.
- 1 egg: Helps bind the filling ingredients together, making it silky and smooth.
- 1 egg white: Brushed on top for a beautiful golden finish during baking.
- ½ cup powdered sugar: Essential for the sweet glaze that finishes the danish with a delicate touch.
- 2 tablespoons milk: Thins the glaze to the perfect consistency for drizzling.
- ½ teaspoon vanilla extract: Adds a final burst of vanilla flavor to the glaze.
How to Make Easy Breakfast Cheese Danish Recipe
Step 1: Prepare the Base
Start by preheating your oven to 350°F (175°C) and lightly greasing a 13×9-inch baking pan. Then, take one can of refrigerated crescent rolls and unroll it gently, pressing the dough firmly into the bottom of the pan while sealing any seams. This forms the flaky, buttery foundation of your danish.
Step 2: Make the Filling
In a mixing bowl, beat together the cream cheese, sugar, vanilla extract, and the whole egg until the mixture becomes smooth and creamy. This luscious filling brings the perfect balance of tanginess and sweetness that makes this dish so irresistible.
Step 3: Spread the Filling
Evenly spread the cream cheese mixture over the crescent roll base, smoothing it out with a spatula to ensure every bite is packed with that rich, creamy goodness.
Step 4: Add the Top Layer
Unroll the second can of crescent rolls and gently place it over the cream cheese filling, carefully pinching the seams together to seal the edges. This top layer will bake into a golden, flaky crust that holds everything together beautifully.
Step 5: Brush and Bake
Brush the top of the dough with the egg white to give it a gorgeous, shiny golden finish as it bakes. Place the pan in the oven and bake for 35 to 45 minutes, or until that tempting golden color appears and the danish smells like heaven.
Step 6: Cool and Glaze
Allow the danish to cool for about 20 minutes after baking. Meanwhile, whisk together powdered sugar, milk, and vanilla extract until smooth to make a sweet glaze. Drizzle this over the warm danish to add a lovely, glossy finish and a touch more sweetness.
Step 7: Slice and Serve
Slice your Easy Breakfast Cheese Danish Recipe into 12 generous pieces and serve it warm or at room temperature, straight from the pan to fill your kitchen with fantastic aromas and your heart with joy.
How to Serve Easy Breakfast Cheese Danish Recipe
Garnishes
Adding a little extra can take your cheese danish from delicious to dazzling. Fresh berries like raspberries or blueberries provide a vibrant pop of color and a tart contrast to the creamy filling. A sprinkle of chopped nuts such as almonds or pecans adds delightful crunch and a nutty depth. For extra indulgence, a light dusting of powdered sugar right before serving makes your danish look bakery-perfect.
Side Dishes
This danish pairs wonderfully with a cup of freshly brewed coffee or a creamy latte, making breakfast feel like a special event. Fresh fruit salad adds refreshing brightness next to the rich flavors, while a glass of fresh orange juice can give a citrusy zing that complements the buttery dough and cream cheese filling.
Creative Ways to Present
For a fun twist, try arranging individual danish slices on a pretty serving platter decorated with edible flowers or herbs like mint for an elegant touch. You can also serve warm slices alongside small bowls of jam or fruit preserves, inviting everyone to customize their bites. If you’re bringing this to a party, a layered tray with alternating danish pieces and fresh fruit makes a stunning display that’s as tasty as it is eye-catching.
Make Ahead and Storage
Storing Leftovers
After enjoying your Easy Breakfast Cheese Danish Recipe, wrap the leftovers tightly with plastic wrap or store in an airtight container to keep them fresh. They will stay moist and delicious for up to 3 days when refrigerated, making it easy to grab a sweet bite anytime.
Freezing
If you want to prepare this danish ahead of time, you can freeze it after baking and cooling completely. Wrap it well in plastic wrap and then in foil or place it in a freezer-safe container. It will keep in the freezer for up to 2 months, ready to thaw when you need a quick breakfast or snack.
Reheating
To bring that fresh-from-the-oven warmth back, reheat individual slices in a microwave for about 20 seconds or warm the whole danish wrapped in foil in a 350°F oven for 10-15 minutes. The glaze and filling will soften beautifully, recreating that perfect, freshly baked experience.
FAQs
Can I use homemade crescent roll dough instead of refrigerated dough?
Absolutely! If you prefer making dough from scratch, a flaky crescent or puff pastry dough works great here. Just ensure it’s rolled out to a similar thickness so the baking time stays consistent.
Is it possible to make this danish dairy-free?
Yes, you can swap the cream cheese for a dairy-free cream cheese alternative and use plant-based milk in the glaze. Be sure to choose a cream cheese that is firm enough to hold the filling together well.
Can I add fruit inside the danish filling?
Definitely! Fresh or thawed berries like blueberries or sliced strawberries can be gently folded into the cream cheese filling before spreading over the dough. This adds a juicy burst of flavor and pretty color.
What can I do if I don’t have powdered sugar for the glaze?
If you’re out of powdered sugar, you can make a simple glaze by mixing granulated sugar with a little hot water to dissolve it, though the texture will be less smooth and the glaze less opaque.
How should I handle seams in the crescent roll dough to prevent leaking?
Pinch seams tightly so the filling stays inside during baking. You can also lightly press the edges together with a fork to seal well and prevent any oozing of the filling.
Final Thoughts
There’s nothing quite like the joy of pulling a warm, golden Easy Breakfast Cheese Danish Recipe out of the oven and sharing it with those you love. This recipe’s unbeatable combination of simplicity and indulgence makes it a dependable favorite for cozy mornings or celebratory brunches. Give it a try—your taste buds and your breakfast table will thank you!
Print
Easy Breakfast Cheese Danish Recipe
- Prep Time: 15 minutes
- Cook Time: 40 minutes
- Total Time: 55 minutes
- Yield: 12 servings
- Category: Breakfast
- Method: Baking
- Cuisine: American
Description
This Easy Breakfast Cheese Danish is a delightful and creamy pastry perfect for morning gatherings or a sweet brunch treat. Made with refrigerated crescent rolls and a smooth cream cheese filling, it’s topped with a simple vanilla glaze that adds just the right amount of sweetness and a glossy finish. With minimal prep and baking time, this recipe offers a delicious homemade Danish without the fuss.
Ingredients
Base and Top Layer
- 2 cans refrigerated crescent rolls
Filling
- 2 (8 oz) packages cream cheese, softened
- 1 cup sugar
- 1 teaspoon vanilla extract
- 1 egg
Glaze
- ½ cup powdered sugar
- 2 tablespoons milk
- ½ teaspoon vanilla extract
- 1 egg white (for brushing the top)
Instructions
- Prepare the Base: Preheat your oven to 350°F (175°C) and lightly grease a 13×9-inch baking pan to prevent sticking.
- Form the Base Layer: Unroll one can of crescent rolls and press it firmly into the bottom of the prepared pan, making sure to seal any seams so the filling doesn’t leak through during baking.
- Make the Filling: In a mixing bowl, beat together the softened cream cheese, sugar, vanilla extract, and one egg until the mixture is smooth and creamy with no lumps.
- Spread the Filling: Evenly spread the cream cheese mixture over the crescent roll base in the pan, ensuring a uniform layer.
- Add the Top Layer: Unroll the second can of crescent rolls and carefully place it over the cream cheese filling. Pinch the seams together to seal the layers properly.
- Brush with Egg White: Lightly brush the top layer with the egg white to achieve a beautiful golden brown finish after baking.
- Bake: Place the pan in the oven and bake for 35 to 45 minutes, or until the top is golden brown and the filling is set.
- Cool Before Glazing: Remove from the oven and let the Danish cool for about 20 minutes to allow the filling to firm up slightly.
- Make the Glaze: Whisk together the powdered sugar, milk, and vanilla extract in a small bowl until smooth and slightly runny.
- Drizzle the Glaze: Pour the glaze evenly over the cooled Danish in a decorative drizzle.
- Slice and Serve: Cut the Danish into 12 equal pieces and serve warm or at room temperature for a delightful breakfast pastry.
Notes
- Ensure the cream cheese is softened to room temperature for easier mixing and a smoother filling.
- You can substitute the milk in the glaze with almond milk or other plant-based milk for a dairy alternative.
- Use a sharp knife to slice the Danish cleanly after baking and cooling to prevent the filling from spilling out.
- For extra flavor, consider adding a teaspoon of lemon zest to the filling.
- Store leftovers covered in the refrigerator for up to 3 days; reheat gently before serving.


