
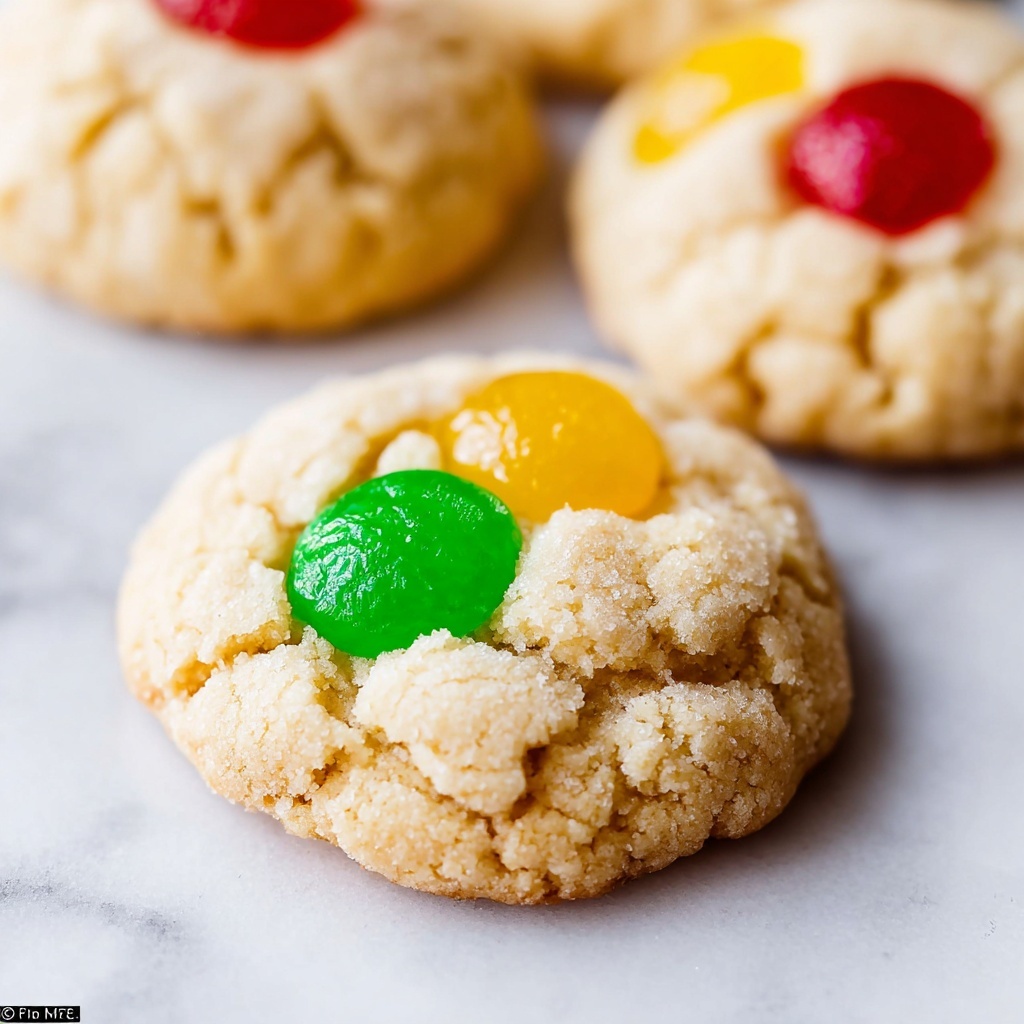
If you’re looking to fill your holiday season with a pop of color, nostalgic flavor, and irresistible chew, you’ve found your new favorite: the Retro Christmas Gumdrop Cookies Recipe. These cookies are pure joy with every bite, combining a tender buttery dough studded with fruity gumdrops that melt just enough to create little pockets of sweet surprise. Perfect for bringing a vintage flair to your cookie platter, this recipe is a heartwarming treat that makes the holiday spirit shine brightly in your kitchen.
Ingredients You’ll Need
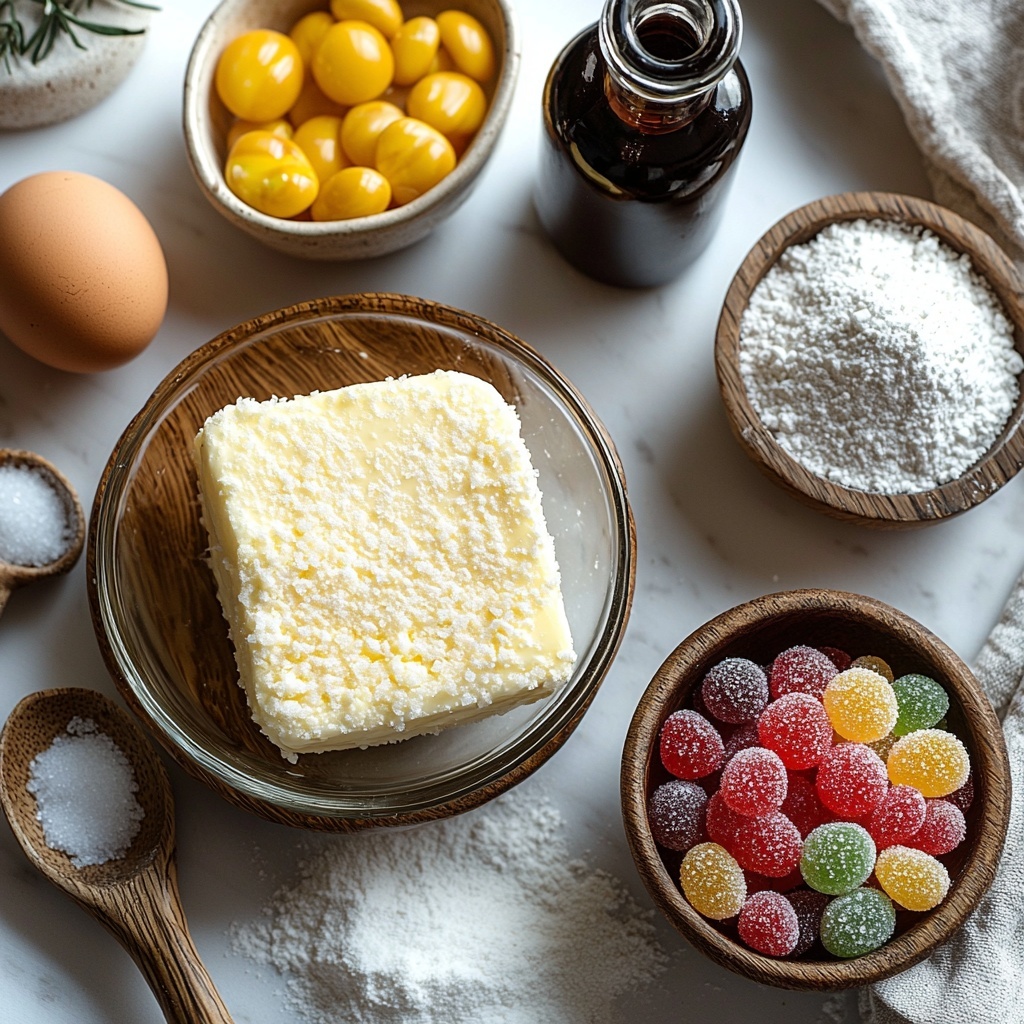
These ingredients are refreshingly simple yet perfectly balanced to create the ideal cookie texture and flavor. Each one plays a crucial role—from the rich butter that makes the cookies tender, to the vibrancy of the chopped gumdrops that give these cookies their signature retro charm.
- 1 cup unsalted butter, softened: This gives the dough a rich and creamy base essential for soft, melt-in-your-mouth cookies.
- 1 cup granulated sugar: Sweetens the dough and helps create that slight golden crust as the cookies bake.
- 1 large egg: Binds the ingredients together while keeping the crumb tender.
- 1 teaspoon vanilla extract: Adds warmth and depth, enhancing the sweetness and aroma.
- 2 1/4 cups all-purpose flour: Forms the structure while keeping the cookies soft yet firm.
- 1/2 teaspoon baking soda: Gives a gentle lift for a light texture.
- 1/4 teaspoon salt: Balances the sweetness and enhances flavors.
- 1 cup fruit-flavored gumdrops, chopped and floured: These bring bursts of chewy fruity goodness and colorful charm to every bite.
How to Make Retro Christmas Gumdrop Cookies Recipe
Step 1: Prep the Gumdrops
Start by chopping your fruit-flavored gumdrops into small pieces—this helps distribute their vibrant color and flavor throughout the cookies. Toss them lightly with a bit of flour to keep them from sticking together or to the dough as you fold them in later.
Step 2: Cream Butter and Sugar
Using a hand mixer or stand mixer, cream together the softened butter and granulated sugar until the mixture is light and fluffy. This step is vital, as it aerates the dough, giving your cookies a tender crumb and just the right amount of lift.
Step 3: Add Egg and Vanilla
Beat in the egg and vanilla extract until the mixture turns smooth and glossy. These ingredients not only bind the cookie dough but also add essential moisture and flavor, setting the stage for delicious cookies.
Step 4: Mix Dry Ingredients
In a separate bowl, whisk together the all-purpose flour, baking soda, and salt. This ensures that the leavening and seasoning are evenly distributed, giving your cookies consistent texture and taste.
Step 5: Combine Wet and Dry Ingredients
Gradually add the dry ingredients to the wet butter mixture, mixing gently until a soft dough forms. Be careful not to overmix here; you want to keep the dough tender and not tough.
Step 6: Fold in Gumdrops
Gently fold the floured gumdrop pieces into the dough, making sure they are spread evenly without breaking them up too much. These pockets of fruity sweetness give these cookies their irresistible retro vibe.
Step 7: Chill the Dough (Optional)
If you have time, chill the dough for about 30 minutes. This helps the cookies hold their shape better while baking and can even improve the flavor as the dough rests.
Step 8: Prepare to Bake
Preheat your oven to 350°F (175°C) and line a baking sheet with parchment paper. Proper prep here ensures even baking and easy cleanup.
Step 9: Scoop and Bake
Scoop tablespoon-sized balls of dough and place them about 2 inches apart on the prepared sheet. This spacing gives each cookie room to spread perfectly.
Step 10: Bake to Perfection
Bake the cookies for 9 to 11 minutes until the edges turn golden and the centers are just set. This balance keeps the cookies soft inside with a slight crispness on the outside.
Step 11: Cool and Enjoy
Let the cookies cool on the baking sheet for about 5 minutes, then transfer them to a wire rack to cool completely. This helps them firm up without losing their tender texture.
How to Serve Retro Christmas Gumdrop Cookies Recipe
Garnishes
For a festive touch, dust your Retro Christmas Gumdrop Cookies Recipe cookies lightly with powdered sugar or drizzle with a bit of white chocolate. Both add a delicate sweetness and festive flair perfect for the holiday season.
Side Dishes
Pair these colorful cookies alongside a warm cup of spiced eggnog, creamy hot chocolate, or a fragrant mulled cider. The bright fruit flavors in the gumdrops complement these cozy drinks beautifully, turning your snack time into a holiday celebration.
Creative Ways to Present
Arrange your cookies in a holiday-themed tin or stack them with red and green parchment paper between each layer. You can also tie a stack with a rustic ribbon for adorable gift presentation that anyone would love to receive or display at your own Christmas party.
Make Ahead and Storage
Storing Leftovers
Once cooled, store your Retro Christmas Gumdrop Cookies Recipe cookies in an airtight container at room temperature. They’ll stay fresh for up to a week, so you can bake a batch ahead of time and savor the seasonal goodness at your leisure.
Freezing
These cookies freeze really well! Place them in a freezer-safe container or bag, separating layers with parchment paper. When ready to enjoy, simply thaw at room temperature for a few hours—still just as tasty as freshly baked.
Reheating
If you want to enjoy your cookies warm, pop them in the oven at 300°F for 5-7 minutes or microwave briefly for 10-15 seconds. The gentle reheating brings back that lovely softness and makes the gumdrops delightfully gooey again.
FAQs
Can I use different types of gumdrops in the Retro Christmas Gumdrop Cookies Recipe?
Absolutely! While fruit-flavored gumdrops are traditional and delicious, feel free to experiment with other flavors or even gummy candies as long as you chop and flour them properly to avoid sticking.
What if I don’t have unsalted butter?
If all you have is salted butter, you can still use it; just reduce or omit the added salt in the recipe to balance the seasoning.
Can I make these cookies vegan or gluten-free?
This particular recipe relies on butter, eggs, and all-purpose flour, so adapting it would require substitutes such as vegan butter, flax eggs, and gluten-free flour blends. The texture might vary, but with some experimentation, you can achieve a delicious result.
Why do I need to toss the gumdrops in flour before mixing?
Tossing the chopped gumdrops in flour prevents them from sinking to the bottom or clumping together in the cookie dough. It helps ensure even distribution for that wonderful burst of flavor in each bite.
How long will these cookies keep their freshness?
Stored in an airtight container at room temperature, they’ll stay fresh and delicious for about 5 to 7 days. Beyond that, freezing is your best bet to maintain quality.
Final Thoughts
I truly hope you’ll give this Retro Christmas Gumdrop Cookies Recipe a try this season. It’s one of those timeless treats that conjures warmth, color, and festive cheer with every bite. Whether you’re baking for family, gifting friends, or just indulging in some holiday nostalgia, these cookies are sure to become a treasured tradition in your kitchen.
Print
Retro Christmas Gumdrop Cookies Recipe
- Prep Time: 15 minutes
- Cook Time: 11 minutes
- Total Time: 31 minutes
- Yield: 24 servings
- Category: Dessert Cookies
- Method: Baking
- Cuisine: American
Description
These Retro Christmas Gumdrop Cookies are a festive treat featuring a soft and buttery dough studded with colorful, chewy fruit-flavored gumdrops. Perfect for holiday cookie exchanges or festive celebrations, these cookies bring a nostalgic and flavorful twist to classic sugar cookies with their bright colors and fruity sweetness.
Ingredients
Cookie Dough
- 1 cup unsalted butter, softened
- 1 cup granulated sugar
- 1 large egg
- 1 teaspoon vanilla extract
- 2 1/4 cups all-purpose flour
- 1/2 teaspoon baking soda
- 1/4 teaspoon salt
Gumdrops
- 1 cup fruit-flavored gumdrops, chopped and floured
Instructions
- Prepare Gumdrops: Chop the gumdrops into small pieces and toss them with a little flour to prevent them from sticking together or sinking to the bottom of the dough during baking.
- Cream Butter and Sugar: In a large mixing bowl, beat together the softened butter and granulated sugar until the mixture is light, fluffy, and well combined.
- Add Egg and Vanilla: Beat in the egg and vanilla extract until the batter is smooth and homogenous.
- Mix Dry Ingredients: In a separate bowl, whisk together the all-purpose flour, baking soda, and salt to evenly distribute the leavening and seasoning.
- Combine Wet and Dry Ingredients: Gradually fold the dry mixture into the wet ingredients until a soft dough forms without over-mixing.
- Fold in Gumdrops: Gently fold the floured gumdrop pieces into the dough to distribute them evenly throughout.
- Chill Dough (Optional): For better cookie shape retention, chill the dough in the refrigerator for 30 minutes before baking.
- Preheat Oven and Prepare Baking Sheet: Preheat your oven to 350°F (175°C) and line baking sheets with parchment paper to prevent sticking.
- Scoop Dough: Using a tablespoon or cookie scoop, portion dough into tablespoon-sized balls and place them 2 inches apart on the prepared baking sheets.
- Bake Cookies: Bake in the preheated oven for 9 to 11 minutes, or until the edges are golden and the centers are just set.
- Cool Cookies: Allow the cookies to cool on the baking sheet for 5 minutes, then transfer to a wire rack to cool completely.
Notes
- Chilling the dough helps the cookies hold their shape and can improve texture.
- Flouring the chopped gumdrops prevents them from sticking or sinking to the bottoms of the cookies.
- You can use different flavors or colors of gumdrops to customize the look and taste.
- Store the cookies in an airtight container at room temperature for up to one week.
- For a more festive touch, consider rolling the cookie dough balls in granulated sugar before baking.


