
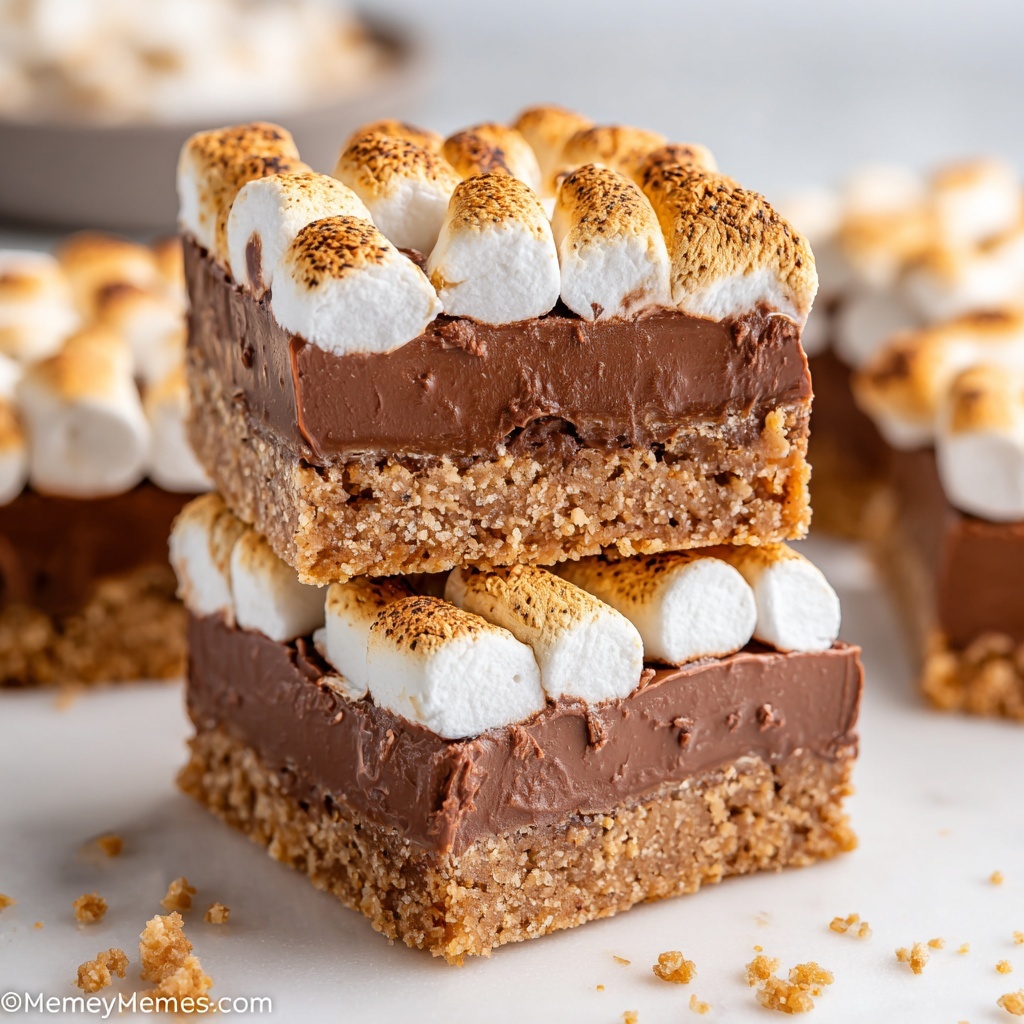
There is something irresistibly magical about this S’mores Bar Recipe that brings all the warmth and nostalgia of a campfire treat straight into your kitchen. With layers of a buttery, crumbly graham cracker crust, melty Hershey’s chocolate, and a perfectly toasted blanket of mini marshmallows, this dessert is a crowd-pleaser that’s perfect for sharing. Whether you want a quick sweet snack or a show-stopping dessert for your next gathering, this recipe turns simple ingredients into a gooey, crunchy delight everyone will adore.
Ingredients You’ll Need
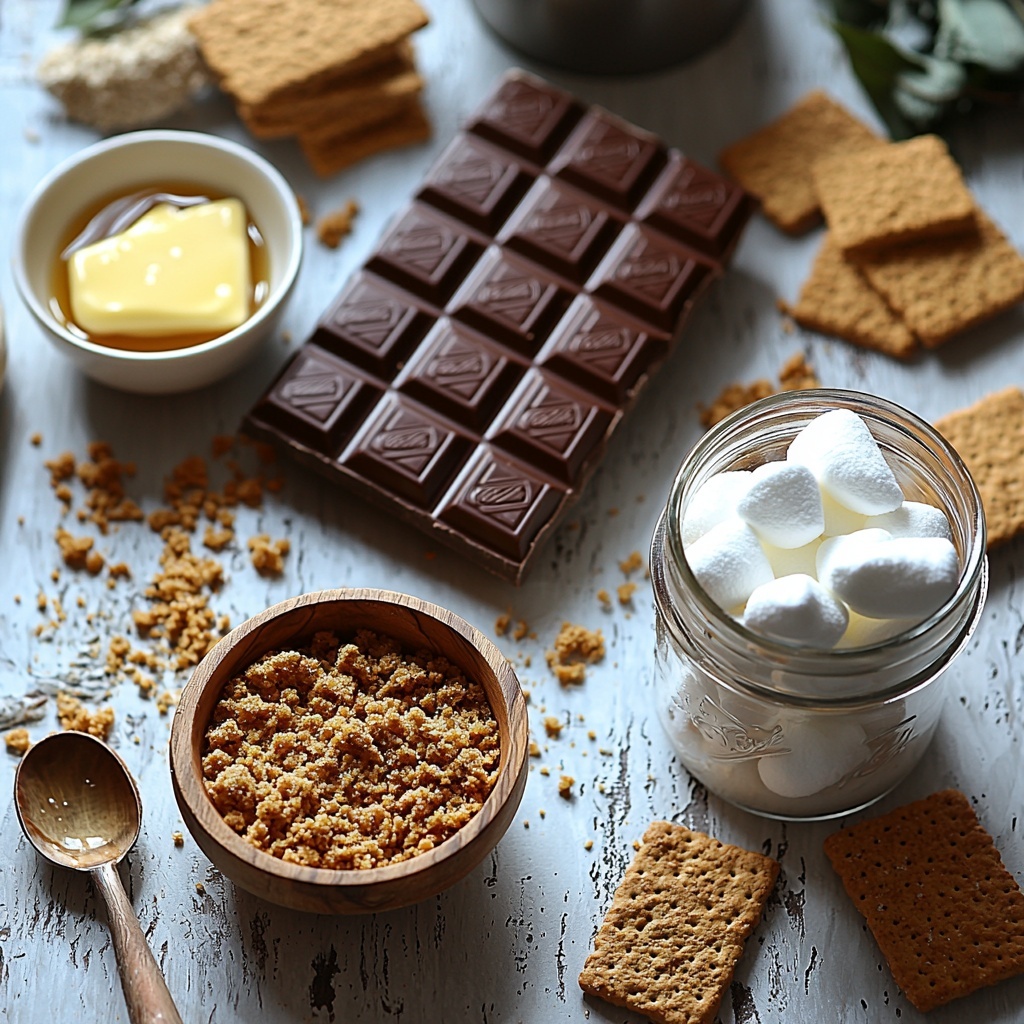
You’d be amazed at how just a handful of everyday ingredients combine to create this S’mores Bar Recipe’s unforgettable flavor and texture. Each component plays a starring role, from the crisp graham cracker base to the luscious chocolate layer and those toasty, golden marshmallows on top.
- Graham cracker crumbs: They form the foundation with a crisp, slightly sweet base perfect for holding everything together.
- Melted butter (8-12 tablespoons): This binds the crust ingredients while adding richness and helps achieve that perfect firm texture.
- Powdered sugar (1/2 cup): Just a touch of sweetness to balance the buttery crust and complement the chocolate and marshmallows.
- Hershey Chocolate Bars (4 bars, 4.4 oz each): Classic milk chocolate bars that melt beautifully, creating a creamy, decadent layer.
- Mini marshmallows (1 package): These little clouds toast up golden and gooey, crowning the bars with that iconic s’mores look and taste.
How to Make S’mores Bar Recipe
Step 1: Prepare Your Oven and Pan
Start by preheating your oven to 350 degrees Fahrenheit. While it warms up, grab a 9×13-inch pan and give it a good coating of non-stick butter spray to prevent any sticking. This step ensures your bars come out cleanly and keeps all those layers intact.
Step 2: Make the Crust Mixture
In a medium bowl, combine 2 cups of graham cracker crumbs with 1/2 cup powdered sugar. Pour in 8 to 12 tablespoons of melted butter and stir with a spoon until the mixture looks like moist sand. The melted butter is your secret weapon here—it helps the crumbs stick together once baked, forming a solid but tender crust.
Step 3: Form and Bake the Crust
Transfer the mixture evenly to your prepared pan. Use your fingers to firmly press it down across the bottom and slightly up the sides, packing it well. Then pop it in the oven for 5 to 8 minutes until the edges just start to turn golden brown. This baking step sets the crust so it won’t crumble when you cut the bars later.
Step 4: Cool Before Adding Chocolate
Take the crust out and let it cool completely. This pause helps the chocolate layer on top stay smooth and prevents it from melting into the crust, keeping every layer distinct and delicious.
Step 5: Layer the Chocolate Bars
Once cooled, break the Hershey bars into pieces and arrange them evenly over the crust, covering as much of the surface as possible. The chocolate will melt into a glossy, luscious layer that perfectly complements the crunchy base.
Step 6: Melt the Chocolate
Put the pan back in the oven for about 3 minutes or until the chocolate just starts to melt and gleams shiny. Keep a close eye so it doesn’t over-melt or burn—this is where the magic happens.
Step 7: Add Mini Marshmallows
Remove the pan and let it cool for a couple of minutes. Then, generously pack the mini marshmallows tightly over the melted chocolate. Their light, pillowy texture is what makes this S’mores Bar Recipe truly memorable.
Step 8: Broil the Marshmallows
Switch your oven setting to “broil” and place the pan inside. Watch those marshmallows carefully as they toast to a golden brown—this usually takes about 2 minutes. It’s crucial to stay vigilant here since marshmallows can go from perfectly toasted to burnt quickly.
Step 9: Cool and Set
Once toasted, remove the bars and let them cool completely. For an extra clean cut, pop them in the refrigerator to firm up for about 30 minutes. This helps prevent the marshmallows from sticking to your knife when slicing.
Step 10: Slice and Serve
When you’re ready to serve, warm a sharp knife under hot water, dry it off, and slice into squares. This trick makes cutting through the gooey layers much easier—just repeat warming the knife if it gets sticky.
How to Serve S’mores Bar Recipe
Garnishes
If you want to add a little flair, sprinkle a pinch of crushed graham crackers or mini chocolate chips on top of the toasted marshmallows right after broiling. A drizzle of caramel or a dusting of cinnamon can also add a cozy twist that will impress your guests.
Side Dishes
Keep it simple with some fresh fruit like strawberries or sliced bananas to balance the sweetness. A scoop of vanilla ice cream served alongside these bars elevates the dessert experience, complementing the warm chocolate and marshmallow layers perfectly.
Creative Ways to Present
For parties, lay the s’mores bars on a rustic wooden board surrounded by small bowls of extra marshmallows, chocolate chunks, and graham crackers for a fun DIY s’mores station. You can also serve each square on mini dessert plates with a dollop of whipped cream for an elegant touch.
Make Ahead and Storage
Storing Leftovers
Keep your leftover s’mores bars in an airtight container at room temperature for up to two days. For longer freshness, storing them in the refrigerator is best—they’ll stay gooey but firm enough to handle easily.
Freezing
These bars freeze well! Wrap individual squares tightly in plastic wrap, then place them in a freezer-safe container or bag. They can be frozen for up to one month. When you’re ready to enjoy, thaw them overnight in the fridge.
Reheating
To bring back that freshly-baked feeling, warm the bars gently in the microwave for about 15 seconds or until soft. Avoid overheating, as the marshmallows can become tough or the chocolate can melt too much.
FAQs
Can I use dark chocolate instead of Hershey’s milk chocolate bars?
Absolutely! Dark chocolate will add a richer, less sweet flavor, which some people prefer. Just make sure the bars melt well for the best texture in your S’mores Bar Recipe.
What’s the best way to prevent marshmallows from burning under the broiler?
The key is to watch them closely and never leave the broiler unattended. Broil them at a distance from the heat source if possible, and remove as soon as you see that golden brown color appear.
Is there a gluten-free version of this recipe?
Yes! Substitute the graham cracker crumbs with a gluten-free graham cracker or cookie crumb alternative. Just be sure it has a similar texture to hold the crust together.
Can I make this recipe vegan?
With a few swaps, yes! Use dairy-free butter and vegan chocolate bars along with vegan marshmallows. The method stays the same, and you’ll still get all the gooey goodness.
How do I store s’mores bars to keep the marshmallows from getting sticky?
Store in an airtight container at room temperature or in the fridge to maintain texture. Refrigeration especially helps keep the marshmallows firm and less sticky.
Final Thoughts
With its irresistible combination of crunchy, melty, and toasted textures, this S’mores Bar Recipe is a guaranteed hit that brings joy and fun to any occasion. I hope you find as much happiness baking and sharing these as I do—go ahead, dive in and make some memories with every delicious bite!
Print
S’mores Bar Recipe
- Prep Time: 10 minutes
- Cook Time: 15 minutes
- Total Time: 25 minutes
- Yield: 16 servings
- Category: Dessert
- Method: Baking
- Cuisine: American
Description
Deliciously gooey and crispy S’mores Bars combining a crunchy graham cracker crust, melted Hershey chocolate, and toasted mini marshmallows. An easy-to-make dessert perfect for gatherings and chocolate lovers.
Ingredients
Crust
- 2 Cups graham cracker crumbs
- 8–12 Tablespoons melted butter
- 1/2 Cup powdered sugar
Topping
- 4 Hershey Chocolate Bars (4.4 ounce each)
- 1 package mini marshmallows
Instructions
- Preheat oven: Preheat your oven to 350 degrees Fahrenheit to prepare for baking the crust.
- Prepare pan: Grease a 9×13 inch baking pan using non-stick butter spray to prevent sticking.
- Mix crust ingredients: In a medium bowl, combine graham cracker crumbs, powdered sugar, and melted butter. Stir well until evenly mixed.
- Press crust: Evenly distribute the graham cracker mixture into the bottom of the baking pan. Use your fingers to firmly press and pack it along the bottom and sides to form an even crust.
- Bake crust: Bake the crust in the oven for about 5-8 minutes until the edges start to turn golden brown. Note that the crust will harden as it cools.
- Cool crust: Remove the pan from the oven and allow the crust to cool completely.
- Layer chocolate: Lay the Hershey bars over the cooled graham cracker crust, covering the surface as evenly as possible.
- Melt chocolate: Return the pan to the oven for approximately 3 minutes, just until the chocolate starts to melt and appear shiny.
- Cool slightly: Let the chocolate cool for 1-2 minutes to set lightly.
- Add marshmallows: Arrange mini marshmallows closely packed on top of the melted chocolate layer.
- Broil marshmallows: Set the oven to broil and place the pan inside. Watch carefully and broil the marshmallows for about 2 minutes until they begin to brown. Remove immediately to prevent burning.
- Cool completely: Allow the bars to cool completely. For best results, refrigerate to help them set and make cutting easier.
- Serve: Use a sharp knife warmed under hot water and dried to slice the bars. Repeat warming the knife as needed to prevent stickiness. Serve and enjoy!
Notes
- The amount of butter can be adjusted between 8-12 tablespoons depending on desired crust firmness.
- Watch the marshmallows carefully during broiling to avoid burning or catching fire.
- Refrigerating the bars after assembling helps them set and makes slicing easier.
- Use a warm, dry knife to cut through the sticky bars cleanly.


