
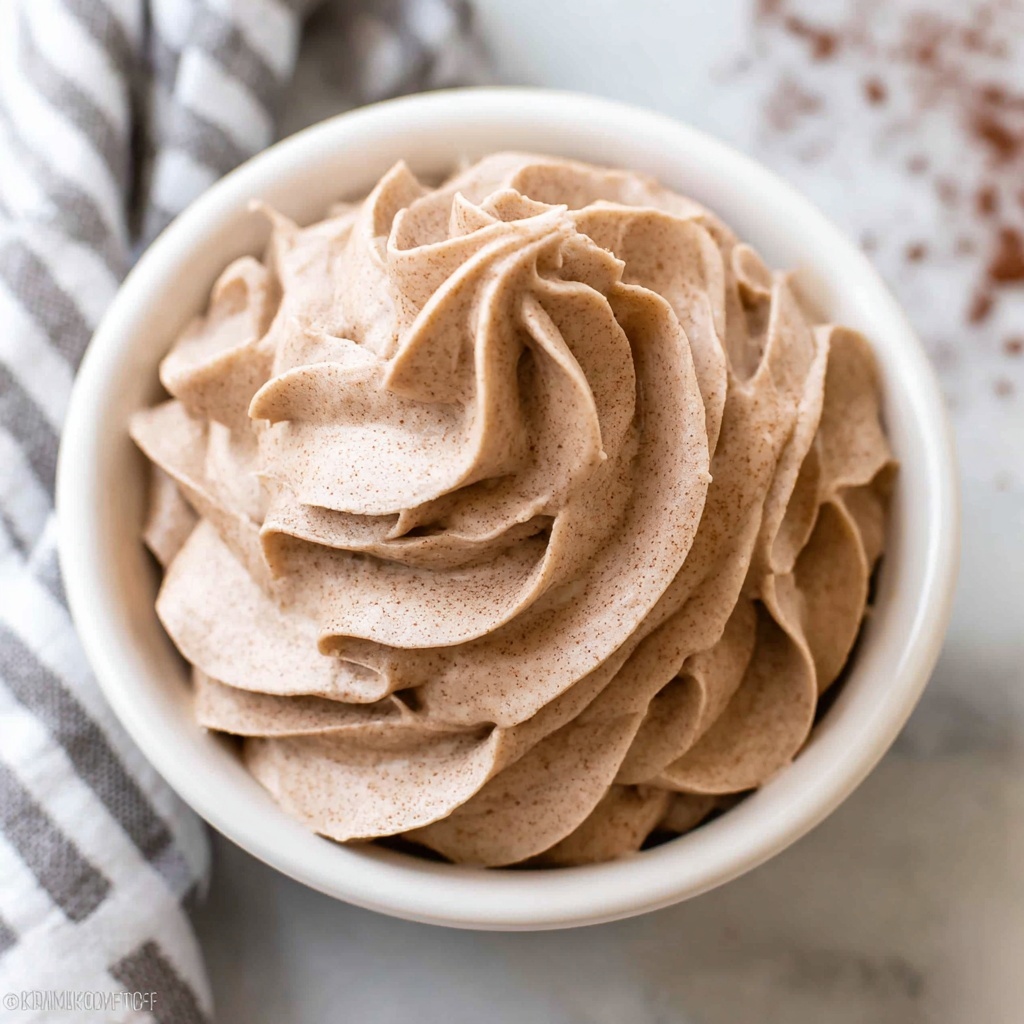
If you have a sweet spot for desserts that feel both luxurious and light, then this Chocolate Whipped Cream Recipe is about to become your new best friend in the kitchen. It’s rich, fluffy, and delightfully chocolatey, transforming any simple dessert into a showstopper with minimal effort. Whether dolloped on your favorite pie, swirled into a hot cup of cocoa, or used as a frosting alternative, this recipe offers a versatile and irresistible topping that’s sure to impress everyone at the table.

Ingredients You’ll Need
The magic of this Chocolate Whipped Cream Recipe lies in its simplicity. Each ingredient plays a vital role in delivering that perfect balance of flavor, texture, and visual appeal, combining to create a creamy treat that’s truly irresistible.
- 2 cups heavy whipping cream: This is the creamy foundation that whips into fluffy peaks, giving the recipe its light, luscious texture.
- ¼ cup heaping cocoa powder: Provides rich chocolate flavor without extra sweetness, keeping the cream perfectly balanced.
- ⅓ cup powdered sugar: Adds just the right amount of sweetness and smoothness without any grittiness.
- 1 teaspoon vanilla extract: Enhances all the flavors, adding warmth and depth to the chocolatey cream.
- Pinch of sea salt: A tiny boost that brings out the chocolate notes and balances the sweetness beautifully.
- Optional add-in: 1 teaspoon espresso powder: A secret weapon for coffee lovers that intensifies the chocolate flavor without overpowering it.
How to Make Chocolate Whipped Cream Recipe
Step 1: Combine Your Ingredients
Start by gathering all your ingredients in a medium-sized bowl. This is the moment where cocoa, cream, sugar, vanilla, and salt come together, ready to transform into a delightful cloud of flavor. If you love a subtle mocha hint, add that teaspoon of espresso powder now – it truly elevates the experience.
Step 2: Whip Until Stiff Peaks
Using a hand mixer or a standing mixer with a whisk attachment, whip the mixture on medium speed. The process takes about 4 to 5 minutes; you’ll know you’re there when the cream forms stiff peaks that hold their shape proudly. Keep an eye on it – overwhipping can turn your luscious cream into butter, and nobody wants that.
Step 3: Chill and Enjoy
Once whipped, chilling is key. Pop the bowl in the fridge until you’re ready to serve. This resting period helps the flavors meld and the texture firm up just enough to maintain those fluffy peaks, making each spoonful a dream come true.
How to Serve Chocolate Whipped Cream Recipe
Garnishes
Presentation is everything, and this Chocolate Whipped Cream Recipe shines with simple yet elegant garnishes. Sprinkle some shaved dark chocolate or a dusting of extra cocoa powder on top for that added chocolate punch and a little visual flair. Fresh berries like raspberries or strawberries bring a pop of color and tartness that pairs beautifully with the cream.
Side Dishes
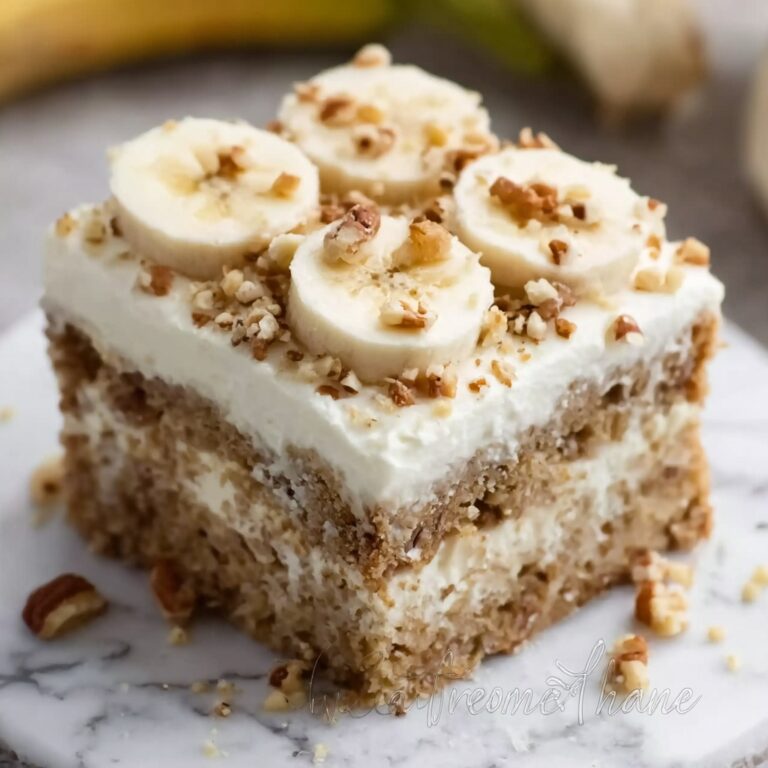
This whipped cream doesn’t just sit pretty on its own; it’s a star companion for countless desserts. Try it alongside rich chocolate cakes, warm apple crisps, or atop freshly brewed coffee. It also works wonders dolloped on pancakes or waffles for a decadent breakfast twist that feels special but is incredibly easy.
Creative Ways to Present
Take your Chocolate Whipped Cream beyond the usual bowl or spoon by piping it into fancy swirls atop cupcakes or tarts. Layer it in parfait glasses with crushed cookies and fruit for a stunning and approachable dessert. Or use it as a filling for cream puffs or sandwich it between cake layers for a light, airy frosting alternative that tastes heavenly.
Make Ahead and Storage
Storing Leftovers
Any leftover Chocolate Whipped Cream Recipe keeps beautifully in an airtight container in the refrigerator for up to two days. Give it a gentle stir with a spatula before serving again to bring back its fluffy texture. Avoid shaking or whisking vigorously to prevent it from becoming grainy or breaking down.
Freezing
Freezing whipped cream can be a bit tricky since the texture might change after thawing. If you’re planning to freeze, dollop it in small portions on a baking sheet, freeze until solid, and then transfer those dollops into a freezer bag. Use within a month, and thaw gently in the fridge, but note it’s best enjoyed fresh for that perfect airy texture.
Reheating
Whipped cream isn’t meant to be reheated since heat can cause it to lose its fluffiness and melt away. If you want a warm dessert experience, add Chocolate Whipped Cream as a cool contrast after heating your dish, preserving its luscious texture and flavor.
FAQs
Can I use regular cocoa powder instead of Dutch-processed?
Absolutely! Regular cocoa powder works perfectly in this recipe, lending that classic chocolate flavor. Just keep in mind Dutch-processed cocoa is usually smoother and less acidic, but both will yield delicious results.
Is there a dairy-free way to make this Chocolate Whipped Cream Recipe?
While traditional whipped cream relies on heavy cream, you can experiment with coconut cream as a dairy-free alternative. Whip chilled coconut cream carefully, and add cocoa and sweetener to taste, though the texture and flavor will differ slightly.
Can I make this ahead of time for a party?
Definitely! This recipe is fantastic for prepping in advance. Whip up the cream, chill it, and keep it refrigerated until serving. It helps save you time during your party and keeps everything tasting fresh and fabulous.
How do I know when the whipped cream has reached stiff peaks?
If you lift the whisk or beaters, the peaks should stand firmly without drooping or melting back into the bowl. Stiff peaks hold their shape beautifully and provide the perfect texture for topping and frosting.
What’s the purpose of adding espresso powder?
Espresso powder intensifies the chocolate flavor without adding a strong coffee taste. It enhances richness and depth, making the Chocolate Whipped Cream Recipe even more decadent while keeping it subtle and balanced.
Final Thoughts
There’s something truly special about homemade whipped cream, and this Chocolate Whipped Cream Recipe turns a classic favorite into an extraordinary treat that’s as easy as it is delicious. It’s versatile, crowd-pleasing, and a wonderful way to add a touch of chocolate bliss to any dessert or snack. So go ahead, whip up a batch, and watch how it elevates your sweets to something unforgettable. You’re going to love every fluffy, chocolatey bite.
Print
Chocolate Whipped Cream Recipe
- Prep Time: 5 minutes
- Cook Time: 10 minutes (whipping time)
- Total Time: 15 minutes
- Yield: 16 servings
- Category: Dessert Topping
- Method: Whipping
- Cuisine: American
Description
This fluffy chocolate whipped cream is a simple yet decadent dessert topping made with heavy whipping cream, cocoa powder, powdered sugar, and vanilla extract. It whips up quickly to create a light, airy frosting or filling perfect for cakes, cupcakes, or enjoying straight from the bowl. Adding a bit of espresso powder enhances the chocolate flavor for an extra depth.
Ingredients
Main Ingredients
- 2 cups heavy whipping cream
- ¼ cup heaping cocoa powder
- ⅓ cup powdered sugar
- 1 teaspoon vanilla extract
- Pinch of sea salt
Optional Add-in
- 1 teaspoon espresso powder
Instructions
- Combine Ingredients: In a medium bowl, add the heavy whipping cream, cocoa powder, powdered sugar, vanilla extract, and a pinch of sea salt. If using, add the espresso powder to boost the chocolate flavor.
- Whip Mixture: Using a hand mixer or a stand mixer fitted with a whisk attachment, whip the mixture on medium speed. Continue whipping for about 4-5 minutes, or until stiff peaks form, which means when you lift the whisk, the peaks hold their shape firmly without collapse.
- Chill and Serve: Chill the whipped cream until you are ready to serve. Enjoy it spoons-full as a dessert treat, or use it as a light and airy frosting or filling for cakes, cupcakes, and other desserts.
Notes
- Ensure the heavy cream is well chilled before whipping for best results.
- Using a metal or glass bowl chilled in the freezer beforehand will help the cream whip faster and hold better.
- Do not overwhip as it can turn into butter. Stop when stiff peaks form.
- Espresso powder is optional but brings out the richness of the cocoa.
- Can be stored in an airtight container in the refrigerator for up to 24 hours.


