

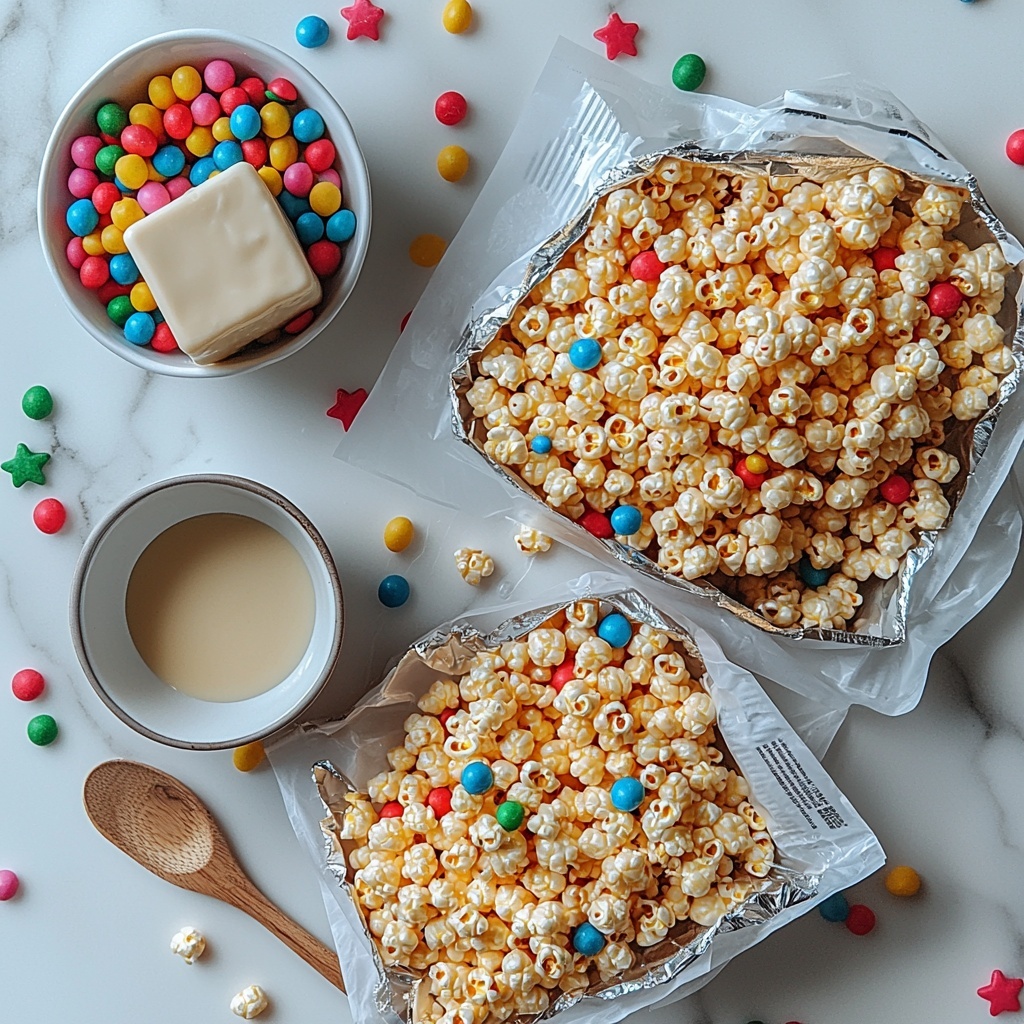
If you’re looking for a snack that’s irresistibly sweet, crunchy, and bursting with festive cheer, the Candied Puff Corn (Christmas Crack) Recipe is an absolute must-try. This treat takes simple puff corn and coats it in luscious vanilla candy, creating a colorful, addictive snack that’s perfect for holiday gatherings or anytime you want a little joyful indulgence. It’s quick to make, wonderfully crunchy, and the sprinkles add that perfect pop of holiday spirit everyone loves. Trust me, once you try this, it will become a beloved tradition every season.
Ingredients You’ll Need
These ingredients are straightforward but essential for creating that perfect balance of sweet, crispy, and playful texture. Each one brings something special to the mix—whether it’s the buttery puff corn base or the smooth vanilla candy coating that makes the whole snack shine.
- Butter flavored puff corn: Choose your favorite brand like Chester’s for a light, airy snack base with a buttery taste.
- Vanilla flavored candy coating: This melts easily and provides that creamy, sweet vanilla glaze that holds everything together.
- Sprinkles: These add that festive pop of color and crunch, perfectly painting your holiday vibe.
How to Make Candied Puff Corn (Christmas Crack) Recipe
Step 1: Prepare Your Workspace and Puff Corn
Start by grabbing a very large bowl or pan to hold the puff corn because you’ll need plenty of room to mix without making a mess. Lay out two large sheets of wax paper on your counter where the coated puff corn will cool and set. This prep helps everything move smoothly in the next steps.
Step 2: Melt the Candy Coating
Follow the instructions on your vanilla candy coating package to melt it perfectly, typically in short bursts in the microwave. The key here is to get a smooth, pourable glaze without overheating. A silky candy coating is what makes the puff corn shine and stick just right.
Step 3: Combine and Coat the Puff Corn
Pour the melted candy coating evenly over the puff corn. Be ready to move quickly, stirring gently but thoroughly until every piece is beautifully coated in that creamy vanilla goodness. This step is fun because you start to see how the basic puff corn transforms into a decadent snack.
Step 4: Spread and Decorate
Immediately transfer the coated puff corn onto your wax paper, spreading it out into a single layer. This ensures it cools evenly and stays delightfully crisp. Now comes the joyful part—sprinkle your festive sprinkles generously over the top. It’s these bursts of color and slight crunch that make this recipe so special.
Step 5: Cool and Store
Let your Candied Puff Corn (Christmas Crack) set fully at room temperature; this usually takes a bit of patience but is worth every second. Once cooled, break it into clusters and store in an airtight container. It keeps fresh for up to a week, perfect for ongoing snacking or gifting to friends.
How to Serve Candied Puff Corn (Christmas Crack) Recipe
Garnishes
While the sprinkles add visual excitement and festive texture, you can get creative by adding chopped nuts, mini chocolate chips, or even a light dusting of edible glitter. These garnishes elevate the snack beyond just a treat—you’re crafting a visual experience that’s as fun to look at as it is to eat.
Side Dishes
This sweet and crunchy delight pairs wonderfully with rich and creamy hot chocolate or a cup of spiced cider. The contrast between warm drinks and crisp, sugary puff corn creates a cozy, comforting holiday experience everyone will love sharing.
Creative Ways to Present
Consider packing portions of the Candied Puff Corn (Christmas Crack) Recipe in clear cellophane bags tied with festive ribbons for holiday gifting. Alternatively, serve it piled high in a large festive bowl at your party, allowing guests to help themselves. You could even layer it with nuts and dried fruit in a large trifle dish for a show-stopping edible centerpiece.
Make Ahead and Storage
Storing Leftovers
Once cooled and broken into clusters, store your Candied Puff Corn in an airtight container at room temperature. Keep it away from moisture and heat to maintain that essential crunch. It will stay fresh and delicious for about a week—perfect to enjoy throughout the holiday season.
Freezing
Although freezing candied puff corn is possible, it’s not generally recommended as the texture can suffer when thawed. The candy coating might become sticky or soft, which detracts from the ideal crispness. Instead, enjoy it fresh or share it quickly with friends and family.
Reheating
Since this treat is meant to be eaten cool and crunchy, reheating isn’t necessary. If you want a warm snack, a quick zap in the microwave for 5 to 10 seconds can help soften the candy coating slightly, but be careful not to melt it completely and lose that crisp texture.
FAQs
Can I use different types of puff corn?
Absolutely! While butter flavored puff corn is classic for this recipe, feel free to experiment with other flavors. Just keep in mind that the vanilla candy coating will complement buttery or plain puff corn best for that perfect sweet-savory balance.
What if I don’t have vanilla candy coating?
If vanilla candy coating is hard to find, white chocolate melts or almond bark can be a wonderful substitute. They melt similarly and offer a creamy texture that clings beautifully to puff corn.
How long does this recipe take from start to finish?
From melting the candy coating to the final coating and cooling, you can have this treat ready in about 20 minutes, making it a quick and easy snack to whip up even last minute.
Can I omit the sprinkles?
Yes! Sprinkles add festive flair and a fun crunch, but if you want a more subtle or allergen-friendly treat, you can skip them without sacrificing the delicious flavor of your candied puff corn.
Is this recipe suitable for kids to help make?
Definitely. This recipe is very kid-friendly, especially the stirring and decorating parts. Just supervise the candy melting step as it involves heat. Kids often love adding sprinkles and watching the transformation from plain puff corn to a magical holiday treat.
Final Thoughts
You truly can’t go wrong with this Candied Puff Corn (Christmas Crack) Recipe. It’s one of those snacks that brings smiles, sweet memories, and an irresistible crunch to any occasion. Whether you’re sharing it at holiday parties or sneaking a handful during a cozy night in, this recipe is pure joy in every bite. So go ahead, gather those simple ingredients, and create a batch for yourself—you won’t regret it!
Print
Candied Puff Corn (Christmas Crack) Recipe
- Prep Time: 5 minutes
- Cook Time: 15 minutes
- Total Time: 20 minutes
- Yield: 15 servings
- Category: Snack
- Method: No-Cook
- Cuisine: American
Description
This Candied Puff Corn, also known as Christmas Crack, is a crunchy, sweet holiday treat made by coating butter-flavored puff corn with melted vanilla candy coating and finishing it with colorful sprinkles. Perfect for festive gatherings, this quick and easy recipe combines light, airy puff corn with a smooth vanilla glaze for a delightful snack.
Ingredients
Snacks
- 2 (3.25-ounce) bags butter flavored puff corn (e.g., Chester’s Puffcorn)
Candy Coating
- 1 (16-ounce) box vanilla flavored candy coating
- Sprinkles (optional, for decoration)
Instructions
- Prepare Puff Corn: Add the butter flavored puff corn to a very large pan or bowl, ensuring enough space to mix and coat evenly. Lay two large sheets of wax paper on the counter to prepare for spreading the coated mixture.
- Melt Candy Coating: Melt the vanilla flavored candy coating in the microwave following the package instructions, usually in short increments while stirring to avoid burning.
- Coat Puff Corn: Drizzle the melted candy coating over the puff corn. Quickly and gently stir to combine, making sure all pieces are evenly coated with the candy glaze.
- Spread and Decorate: Spread the coated puff corn out onto the wax paper in a single layer to cool and set. Sprinkle with colorful sprinkles if desired to add a festive touch.
- Cool and Store: Allow the coated puff corn to cool completely until the candy coating hardens. Store the finished product in an airtight container to keep it fresh, up to one week.
Notes
- Be sure to work quickly when mixing the melted candy coating with the puff corn as it hardens fast.
- Use wax paper or parchment paper for easy cleanup and to prevent sticking.
- You can customize the recipe with different colored sprinkles for various occasions.
- Store in an airtight container at room temperature for up to one week for best freshness.