

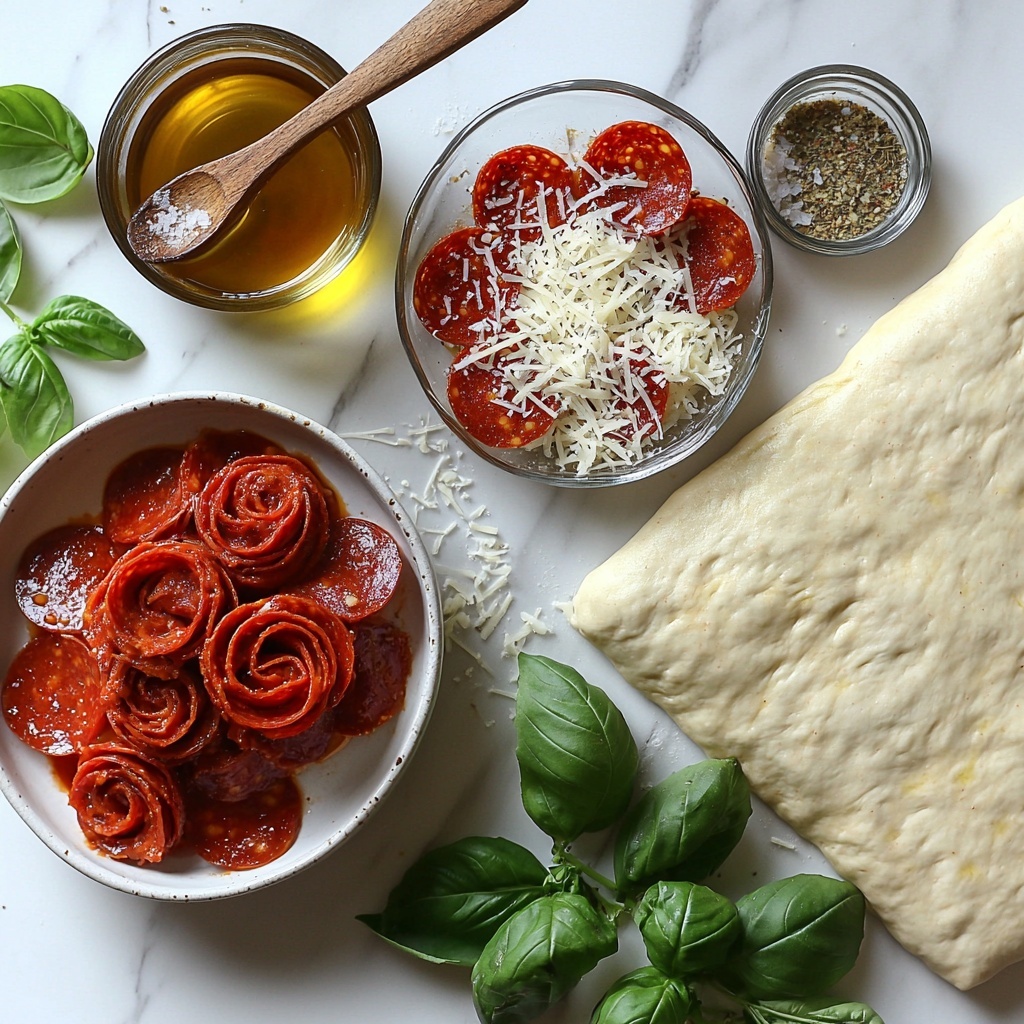
If you’re searching for a fun, delicious appetizer or a charming snack to impress friends and family, look no further than this Cheesy Baked Italian Pizza Roses Recipe. These delightful little bites take classic pizza flavors like melty mozzarella, tangy marinara, and spicy pepperoni and wrap them up in a beautiful rose shape that’s almost too pretty to eat. But trust me, once you taste that perfect combination of cheesy gooeyness and crisp golden dough, you’ll want to make these pizza roses again and again.
Ingredients You’ll Need
The magic of this Cheesy Baked Italian Pizza Roses Recipe lies in how simple yet thoughtfully chosen ingredients come together for an irresistible result. Each ingredient adds to the overall flavor balance, texture, and eye-catching appeal of the dish.
- 1 pound pizza dough: Provides the soft, chewy base that’s essential for folding into rose shapes with the right structure.
- 1 cup shredded mozzarella cheese: Brings creamy meltiness and melts beautifully inside each rose petal.
- 1/2 cup grated Parmesan cheese: Adds a sharp, salty kick and complements the mozzarella perfectly.
- 20 slices pepperoni: Delivers the classic pepperoni spice and vibrant red color that makes these roses pop.
- 1 cup marinara sauce: For dipping, introduces a fresh tomato tang that brightens every bite.
- 1 tablespoon olive oil: Used to brush on top, giving the dough a golden, crispy finish.
- 1 teaspoon Italian seasoning: Sprinkled on top for a fragrant herb boost that ties all the flavors together.
- 1/4 teaspoon salt: Enhances all the ingredients’ natural flavors without overpowering them.
- Fresh basil leaves (optional): For garnish, adding a fresh, aromatic touch and a splash of green color.
How to Make Cheesy Baked Italian Pizza Roses Recipe
Step 1: Prepare your muffin pan and dough
Start by preheating your oven to 375 degrees F so it’s ready to go once the roses are formed. Lightly grease a 12-cup muffin pan—this will keep your pizza roses from sticking and help them hold their shape nicely while baking.
Step 2: Roll out and cut the dough
On a floured surface, roll out the pizza dough into a thin rectangle, about 1/8 inch thick. Precision here is key for evenly baked roses that aren’t too doughy or too crispy. Next, cut the dough into 12 strips roughly 1.5 inches wide and 8 inches long. This size makes rolling easy and helps create beautiful, rose-like layers.
Step 3: Layer on pepperoni and cheese
Lay two slices of pepperoni end to end along each strip of dough, creating a colorful and flavorful base. Generously sprinkle a mixture of shredded mozzarella and grated Parmesan over the pepperoni to guarantee that cheesy goodness will shine through in every bite.
Step 4: Roll and place into muffin cups
Starting at one end of the strip, carefully roll the dough up into a spiral to form the rose shape. Place each rolled strip into a prepared muffin cup, arranging them so the layers look like petals. This step adds the signature look that makes this Cheesy Baked Italian Pizza Roses Recipe a showstopper.
Step 5: Add finishing touches before baking
Brush each rose with olive oil to promote a gorgeously browned and crispy outer layer. Sprinkle Italian seasoning and salt over the top to boost the herbal aroma and seasoning profile.
Step 6: Bake to perfection
Bake for 18 to 20 minutes until the dough is a beautiful golden brown and the cheese inside is melted to ooey-gooey perfection. The kitchen will smell heavenly by this point, making it hard to wait!
Step 7: Cool and serve
Let the pizza roses cool for about 5 minutes before carefully removing them from the muffin pan. Serve warm with marinara sauce on the side for dipping and garnish with fresh basil leaves if you want that extra touch of freshness and color.
How to Serve Cheesy Baked Italian Pizza Roses Recipe
Garnishes
Fresh basil leaves add a burst of green and fragrant herb flavor that contrasts beautifully with the warm, cheesy petals of your pizza roses. A light sprinkle of extra Parmesan or a drizzle of balsamic glaze can also elevate presentation and taste.
Side Dishes
Pair these pizza roses with a crisp green salad dressed in a tangy vinaigrette, or serve alongside a bowl of spicy roasted red pepper soup for a cozy, comforting meal. For a party spread, add an antipasto platter featuring olives, artichokes, and cured meats to complete the Italian vibe.
Creative Ways to Present
Arrange the pizza roses on a rustic wooden board or a bright ceramic platter for a visually stunning centerpiece. You can even sprinkle edible flowers around for a whimsical touch. Serving these with small ramekins of different dipping sauces like garlic butter or pesto creates fun flavor variations that guests will adore.
Make Ahead and Storage
Storing Leftovers
If you have any leftover pizza roses, place them in an airtight container in the refrigerator. They’ll stay fresh for up to 3 days and maintain their texture and flavor nicely when properly stored.
Freezing
These pizza roses also freeze well. Wrap each rose individually in plastic wrap, then place them all in a freezer-safe bag or container. They can be frozen for up to one month and are perfect to have on hand for quick snacks or unexpected guests.
Reheating
Reheat leftover or frozen pizza roses in a 350 degree F oven for about 10 minutes until warmed through and crisp again. Avoid microwaving as it can make the dough soggy and chewy instead of crispy and delicious.
FAQs
Can I use store-bought pizza dough for this recipe?
Absolutely! Store-bought pizza dough works perfectly and saves time. Just make sure to roll it out evenly and keep it chilled before slicing and assembling.
What types of cheese can I substitute for mozzarella or Parmesan?
You can swap mozzarella for provolone or fontina for a slightly different melt and flavor. For Parmesan, Pecorino Romano is a great substitute with a similar sharp, salty profile.
Is this recipe suitable for kids?
Definitely! Kids love the fun rose shapes and the familiar pizza flavors. You can customize the pepperoni or add veggies for picky eaters to make it their own.
Can I make these vegan or dairy-free?
Yes, try using dairy-free cheese alternatives and a vegan dough recipe. Just be mindful that the texture and melt might differ slightly, but the rose presentation stays just as charming.
How do I prevent the dough from becoming soggy?
Rolling the dough thinly and baking at the right temperature in a greased muffin pan helps maintain a crispy bottom and prevents sogginess. Also, don’t overload with too much sauce inside the roses.
Final Thoughts
This Cheesy Baked Italian Pizza Roses Recipe is such a joyful way to enjoy all the best parts of pizza wrapped up in a fun, elegant design. Whether you’re making it for a casual snack, a festive party, or a cozy night in, it’s bound to bring smiles around the table. So grab your favorite pizza ingredients, get rolling, and create some beautifully tasty pizza roses that everyone will rave about!
Print
Cheesy Baked Italian Pizza Roses Recipe
- Prep Time: 15 minutes
- Cook Time: 20 minutes
- Total Time: 35 minutes
- Yield: 12 pizza roses
- Category: Appetizer
- Method: Baking
- Cuisine: Italian
Description
Cheesy Baked Italian Pizza Roses are a creative and visually stunning twist on traditional pizza. Made by rolling strips of pizza dough with pepperoni and cheeses into rose shapes, then baked to golden perfection, these bite-sized treats are perfect for parties, appetizers, or a fun family dinner. Served with warm marinara sauce and fresh basil, they combine rich Italian flavors with an elegant presentation.
Ingredients
Pizza Dough and Base
- 1 pound pizza dough
- 1 tablespoon olive oil
- 1/4 teaspoon salt
- 1 teaspoon Italian seasoning
Cheeses
- 1 cup shredded mozzarella cheese
- 1/2 cup grated Parmesan cheese
Toppings and Sauce
- 20 slices pepperoni
- 1 cup marinara sauce
- Fresh basil leaves (optional)
Instructions
- Preheat and Prepare Pan: Preheat your oven to 375°F (190°C) and lightly grease a 12-cup muffin pan to prevent the dough roses from sticking during baking.
- Roll Dough: On a floured surface, roll out the pizza dough into a thin rectangle approximately 1/8 inch thick, ensuring an even thickness for uniform cooking.
- Cut Dough Strips: Slice the rolled dough into 12 strips, each about 1.5 inches wide and 8 inches long, to create the base for the pizza roses.
- Add Toppings: On each strip, place two slices of pepperoni end to end. Then sprinkle an evenly mixed combination of mozzarella and Parmesan cheeses over the pepperoni.
- Form Roses: Starting at one end of each strip, carefully roll the dough and toppings up into a rose shape, creating visible layers like rose petals. Place each rolled rose into a separate muffin cup, keeping them upright.
- Season and Oil: Brush the tops of each rose with olive oil, then sprinkle Italian seasoning and salt evenly over the surface for added flavor and a golden crust.
- Bake: Bake in the preheated oven for 18 to 20 minutes, or until the dough turns golden brown and the cheese has fully melted.
- Cool and Serve: Allow the pizza roses to cool for 5 minutes in the pan before gently removing them. Serve warm with marinara sauce for dipping and garnish with fresh basil leaves if desired.
Notes
- You can substitute pepperoni with other toppings such as sliced sausage, ham, or vegetables.
- For a crispier crust, cook a few minutes longer but keep a close eye to prevent burning.
- Use a pizza dough recipe or store-bought dough depending on convenience and preference.
- These pizza roses can be made ahead and reheated in the oven for a few minutes before serving.
- Fresh basil leaves add a bright, fresh flavor but can be omitted if unavailable.


