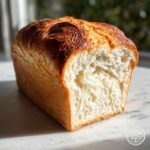
Description
This Classic White Sandwich Bread recipe delivers a soft, fluffy loaf perfect for sandwiches, made with gluten-free all-purpose flour for those with gluten sensitivities. Combining simple ingredients such as yeast, eggs, and olive oil, this easy-to-make bread bakes to a beautifully golden crust and tender crumb, ideal for everyday meals and snacks.
Ingredients
Scale
Dry Ingredients
- 2 cups gluten-free all-purpose flour
- 1 tablespoon sugar
- 1 teaspoon salt
- 1 tablespoon active dry yeast
Wet Ingredients
- 1 cup warm water
- 2 tablespoons olive oil
- 2 eggs
Instructions
- Preheat and Prepare: Preheat your oven to 375°F (190°C) and grease a loaf pan to prevent sticking during baking.
- Mix Dry Ingredients: In a mixing bowl, combine the gluten-free flour, sugar, salt, and active dry yeast evenly to form the base of your dough.
- Add Wet Ingredients and Mix: Pour in the warm water, olive oil, and eggs to the dry ingredients. Stir until a smooth and consistent dough forms, ensuring everything is well incorporated.
- Shape and Transfer: Transfer the dough into the prepared loaf pan and use a spatula to smooth the top for even baking and a neat finish.
- Bake the Bread: Place the loaf pan in the preheated oven and bake for about 40 minutes or until the bread turns a golden brown and sounds hollow when tapped, indicating it is fully cooked.
- Cool the Bread: Remove the bread from the oven, let it cool in the pan for 10 minutes to stabilize, then transfer to a wire rack to cool completely before slicing.
Notes
- Make sure the water is warm, not hot, to activate the yeast without killing it.
- Allowing the bread to cool completely before slicing prevents it from becoming gummy.
- This bread is gluten-free, making it a great option for those with gluten intolerance or celiac disease.
- You can store the bread in an airtight container at room temperature for up to 3 days or freeze slices for longer storage.
- For a dairy-free version, confirm that your gluten-free flour blend and yeast are dairy-free, as eggs and olive oil are naturally dairy-free.