

If you’re craving a side dish that feels like a warm hug on a plate, look no further than Creamed Peas Made Easy: A Creamy Comfort Food Delight Recipe. This classic comfort food combines tender, sweet peas with a luscious, creamy sauce that’s so simple to whip up, it quickly becomes a weeknight favorite. Whether you’re serving it alongside a roasted chicken or just craving a little bowl of cozy deliciousness, these creamed peas hit all the right notes with their velvety texture, subtle sweetness, and perfectly seasoned sauce. Let me show you how easy it is to bring this creamy comfort food to life!
Ingredients You’ll Need
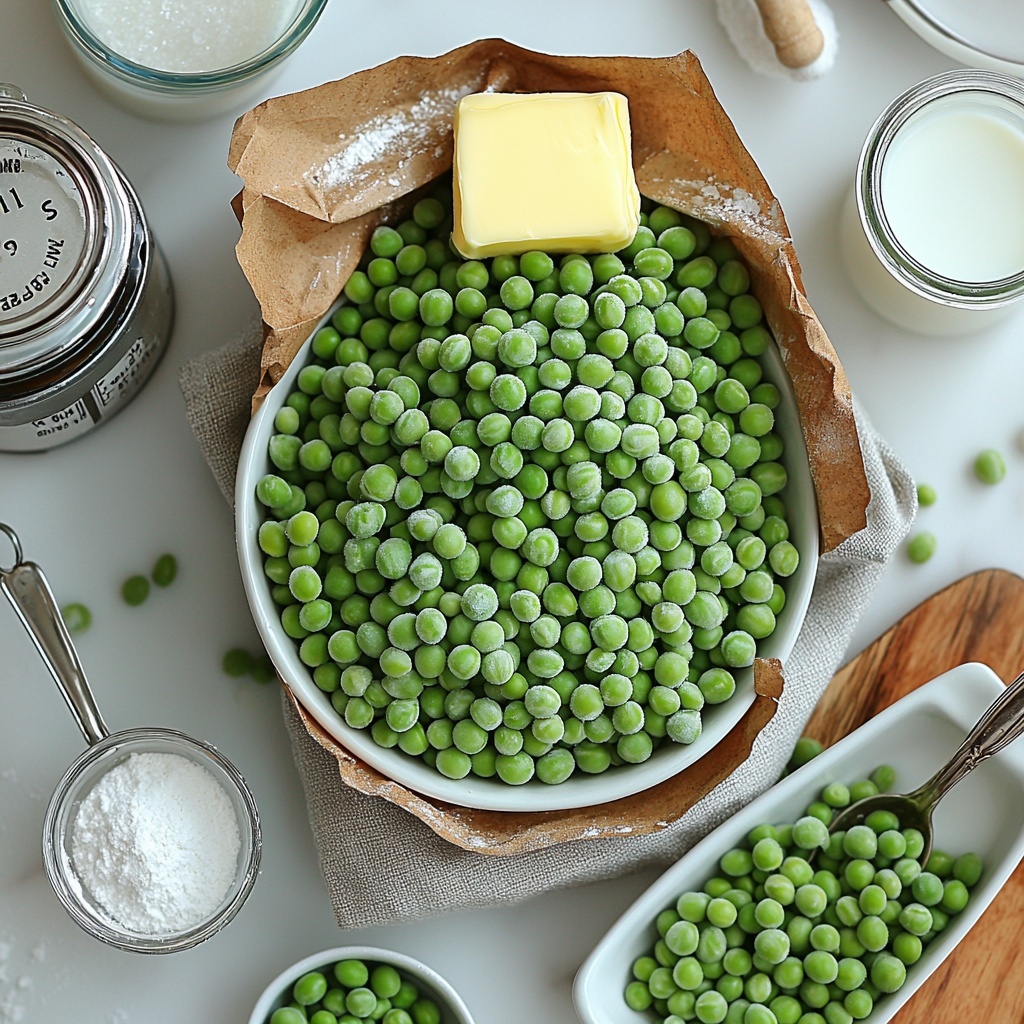
Gathering the right ingredients for this recipe is a breeze since they are all pantry staples or easy to find in the freezer aisle. Each one plays a crucial role in delivering that smooth, rich texture and sweet, fresh flavor that defines creamed peas.
- Frozen peas: The star of the dish, these add sweetness and a pop of color that brightens every bite.
- Butter: Adds richness; substitute with olive oil for a dairy-free version without sacrificing flavor.
- All-purpose flour: Thickens the sauce beautifully, giving it just the right creamy consistency (gluten-free flour works fine, too).
- Salt: Essential for enhancing the overall flavor; adjust to your taste for the perfect balance.
- Pepper: Adds depth; black pepper lends a classic warmth, while white pepper offers a gentler note if you prefer.
- Whole milk: Creates that dreamy creamy consistency; you can swap in half-and-half or a non-dairy milk to lighten things up.
- Sugar: Just a touch to balance the flavors and bring out the peas’ natural sweetness; optional if you prefer less sweet.
How to Make Creamed Peas Made Easy: A Creamy Comfort Food Delight Recipe
Step 1: Cook the Peas
Start by lightly steaming or boiling your frozen peas just until tender but still vibrant green. This brings out their fresh sweetness and ensures they soften perfectly without turning mushy. Drain if necessary and set aside.
Step 2: Make the Roux
In a medium saucepan, melt the butter over medium heat. Once melted and shimmering, sprinkle in the flour and stir constantly for about 1-2 minutes. This cooks out the raw flour taste and forms a smooth paste, setting the foundation for your creamy sauce.
Step 3: Add Milk and Seasonings
Slowly pour the milk into the roux, whisking constantly to prevent lumps. Bring the mixture to a gentle simmer, allowing it to thicken nicely and coat the back of a spoon. At this stage, stir in salt, pepper, and sugar. Taste and adjust seasoning—this is where the flavor really blossoms.
Step 4: Combine Peas and Sauce
Gently fold the cooked peas into the creamy sauce. Heat through for another couple of minutes to meld all the flavors together. The peas should be tender and fully coated in a silky, dreamy sauce that’s golden with comfort.
How to Serve Creamed Peas Made Easy: A Creamy Comfort Food Delight Recipe
Garnishes
A sprinkle of freshly chopped parsley or chives adds a pop of color and fresh herbal brightness that complements the creamy peas beautifully. For an extra touch of indulgence, a dash of grated Parmesan or a pat of butter melted on top can make all the difference.
Side Dishes
Creamed peas shine as a side for savory mains like roast chicken, grilled pork chops, or a simple baked salmon. Their creamy texture pairs wonderfully with crispy, roasted potatoes or a fluffy, buttery mashed potato to create a comforting, well-rounded meal.
Creative Ways to Present
Want to jazz it up? Serve your creamed peas over toasted rustic bread for a unique open-faced lunch. Or, layer them in a casserole topped with breadcrumbs and bake until golden and bubbly for a crowd-pleasing twist. The possibilities are endless!
Make Ahead and Storage
Storing Leftovers
Once cooled, transfer any leftover creamed peas to an airtight container and store it in the refrigerator. They’ll stay fresh for up to 3 days, making them perfect for quick reheats and second-day meals.
Freezing
This recipe does freeze well if you want to prepare in advance. Portion the cooled creamed peas into freezer-safe containers or bags and freeze for up to 2 months. Just keep in mind the texture might soften a little after thawing.
Reheating
Reheat gently on the stovetop over low heat, stirring frequently until warmed through. You may want to add a splash of milk to refresh the creaminess. Avoid microwaving on high to keep the texture silky and smooth.
FAQs
Can I use fresh peas instead of frozen?
Absolutely! Fresh peas bring even more vibrant flavor, but they’ll need to be cooked a bit longer depending on their freshness. Keep a close eye to ensure they stay tender without overcooking.
Is there a dairy-free version of this recipe?
Yes! Swap out butter for olive oil and use a plant-based milk like almond or oat milk. You can also use gluten-free flour to keep it completely allergy-friendly.
What can I add to make this dish more flavorful?
Try stirring in minced garlic or a pinch of nutmeg to the sauce for deeper flavor. A splash of chicken broth instead of some milk can also add a lovely savory note.
Can I make this recipe vegan?
Definitely! Use plant-based butter or olive oil, non-dairy milk, and gluten-free flour if needed. The peas themselves are plant-based so this recipe adapts well.
How thick should the sauce be?
The sauce should be creamy and coat the peas but not overly thick—think rich enough to hold together but still tender. If it’s too thick, loosen it with a little extra milk.
Final Thoughts
This Creamed Peas Made Easy: A Creamy Comfort Food Delight Recipe truly proves that simple ingredients can create magic on your plate. It’s a timeless side that brings warmth and comfort with every spoonful. I can’t wait for you to try this recipe and make it your own, turning everyday meals into something that feels just a little more special.
Print
Creamed Peas Made Easy: A Creamy Comfort Food Delight Recipe
- Prep Time: 5 minutes
- Cook Time: 10 minutes
- Total Time: 15 minutes
- Yield: 4 servings
- Category: Side Dish
- Method: Stovetop
- Cuisine: American
Description
Creamed Peas Made Easy is a comforting and creamy side dish featuring sweet frozen peas in a rich, buttery sauce. This quick and simple recipe comes together in just 15 minutes, making it perfect for weeknight dinners or holiday meals. The sauce is thickened with a classic roux of butter and flour, then enriched with whole milk for a smooth, velvety texture. Seasoned with salt, pepper, and a hint of sugar, these creamed peas are both flavorful and satisfying.
Ingredients
Ingredients
- 1 bag Frozen peas (approximately 12 oz)
- 2 tablespoons Butter
- 2 tablespoons All-purpose flour
- 1 teaspoon Salt
- 1 teaspoon Pepper
- 1 cup Whole milk
- 1 teaspoon Sugar
Instructions
- Prepare the Peas: Begin by thawing the frozen peas slightly if needed, or you can cook them straight from frozen. This helps to bring out their natural sweetness and bright green color.
- Make the Roux: In a medium saucepan, melt the butter over medium heat. Once melted, sprinkle in the all-purpose flour. Stir continuously to combine, cooking the mixture for about 1-2 minutes to remove the raw flour taste, forming a smooth roux.
- Add Milk Slowly: Gradually whisk in the whole milk to the roux, making sure to break up any lumps. Continue to whisk and cook until the sauce begins to thicken, about 3-5 minutes.
- Season the Sauce: Stir in the salt, pepper, and sugar to the milk sauce. These seasonings enhance the flavor and balance the sweetness of the peas.
- Combine Peas and Sauce: Add the frozen peas directly to the saucepan with the thickened sauce. Stir well to coat the peas evenly, and cook together for an additional 3-5 minutes until the peas are tender and heated through.
- Final Touches: Taste the creamed peas and adjust seasoning if necessary. Serve hot as a delicious and creamy side dish that pairs well with a variety of main courses.
Notes
- You can substitute butter with olive oil to make this dish dairy-free.
- Use gluten-free flour to make the recipe gluten-free.
- For a richer dish, substitute whole milk with half-and-half or cream.
- If you prefer less sweetness, you can omit the sugar.
- Leftovers can be stored in an airtight container in the refrigerator for up to 3 days.


