

Get ready to brighten up your celebrations with the Delightful Pot O’ Gold Cups for Your St. Patrick’s Day Bash Recipe — a playful, colorful dessert that captures the magic of the holiday in every bite. These little brownie cups topped with fluffy whipped cream and vibrant rainbow candies bring a festive spirit that’s perfect for sharing with friends and family. They’re easy to whip up, look impressive, and deliver a perfect harmony of rich chocolate, creamy topping, and fun textures that will have everyone asking for the recipe!
Ingredients You’ll Need
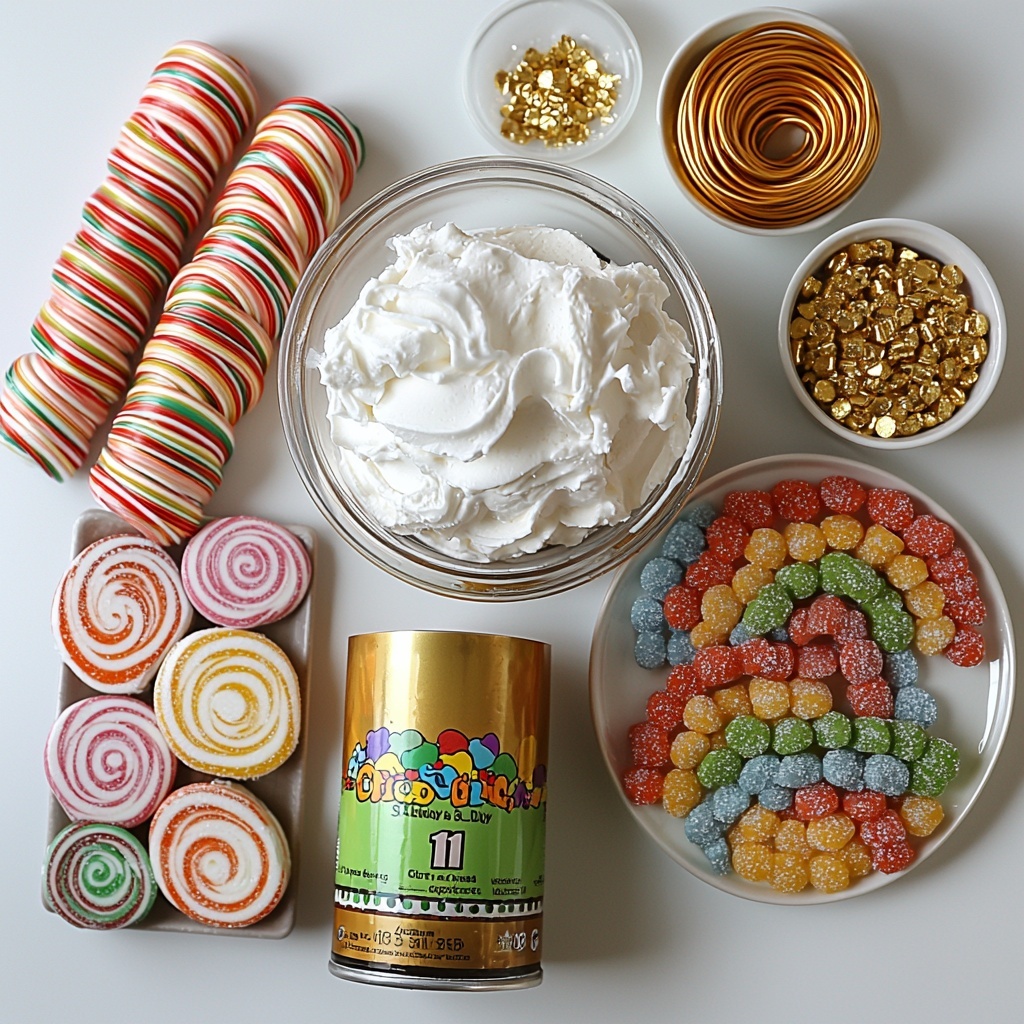
Don’t let the simplicity fool you—each ingredient in the Delightful Pot O’ Gold Cups for Your St. Patrick’s Day Bash Recipe plays a crucial role in creating that perfect balance of flavor, texture, and festive flair. These essentials make the baking process straightforward yet yield deliciously impressive results.
- Cooking spray: Prevents the brownies from sticking to the muffin tin, ensuring easy removal and a neat presentation.
- Box brownie mix: Choose your favorite brand to guarantee a rich, fudgy base that’s both quick and reliable for a homemade taste.
- Whipped cream: Acts as the light, cloud-like topping that contrasts beautifully with the dense brownie underneath.
- Rainbow candy belts: Adds a burst of color, whimsy, and chewy texture, making each cup look like a pot of treasure.
- Gold sanding sugar: Delivers sparkling golden accents that capture the essence of St. Patrick’s Day gold coins and make the dessert shine.
How to Make Delightful Pot O’ Gold Cups for Your St. Patrick’s Day Bash Recipe
Step 1: Prepare the Baking Equipment
Start by preheating your oven to 350°F (175°C). Lightly spray a muffin tin with cooking spray or line it with parchment paper to ensure the brownies pop out cleanly after baking. A well-prepared pan is the foundation for those perfect pots of gold.
Step 2: Mix the Brownie Batter
Follow the box brownie mix instructions carefully and stir until the batter is smooth and silky. This easy step sets you up for luscious, fudgy brownie cups that serve as the perfect base for the toppings.
Step 3: Fill and Bake
Fill each muffin cup about two-thirds full with the brownie batter. This ensures there’s room for the raised edges and that the brownies will bake into nicely shaped cups. Bake in the preheated oven for approximately 20 minutes, or until a toothpick inserted near the center comes out mostly clean or with just a few moist crumbs.
Step 4: Cool Your Brownie Cups
Once out of the oven, let the brownies cool in the pan for a few minutes to firm up, then gently remove each one and transfer them to a wire rack. Cooling completely is key for the toppings to hold their shape without melting or sliding off.
Step 5: Assemble the Delightful Pot O’ Gold Cups for Your St. Patrick’s Day Bash Recipe
Top each cooled brownie cup with a generous dollop of whipped cream, creating the soft “cloud” effect. Then, carefully twist and place strips of rainbow candy belts over the whipped cream to resemble vibrant rainbows arcing from a pot of gold. Finish with a sprinkle of gold sanding sugar to add sparkling magic and complete the festive look.
How to Serve Delightful Pot O’ Gold Cups for Your St. Patrick’s Day Bash Recipe
Garnishes
Beyond the candy belts and gold sugar, consider adding tiny edible shamrocks or mint leaves for a natural green accent that complements the rainbow colors beautifully. A light dusting of cocoa powder or cinnamon can also add a subtle depth of flavor and a charming rustic touch.
Side Dishes
Serve these sweet delights alongside a refreshing mint lemonade or a warm cup of Irish coffee for a perfect holiday pairing. They also work wonders alongside simple fruit salads to balance the richness and bring additional freshness to your dessert spread.
Creative Ways to Present
Elevate your presentation by placing the cups in individual mini flower pots lined with decorative tissue paper, mimicking real “pots of gold.” Alternatively, arrange them on a dark wooden tray adorned with fresh clovers and gold coins (chocolate, of course) for a truly stunning St. Patrick’s Day centerpiece.
Make Ahead and Storage
Storing Leftovers
If you have any brownies left (which might be hard!), store them in an airtight container in the refrigerator for up to 3 days. Keep the whipped cream topping separate if possible, and add it fresh just before serving to keep the cups looking and tasting their best.
Freezing
You can freeze the baked brownie cups without toppings by wrapping them tightly in plastic wrap and placing them in a freezer-safe container for up to two months. Let them thaw completely before adding whipped cream and decorations to preserve texture and flavor.
Reheating
If you prefer your brownie cups warm, gently microwave them for about 10-15 seconds. Avoid reheating once the whipped cream and candy decorations are added, as they can melt or become sticky. Add toppings fresh after warming for the best experience.
FAQs
Can I use homemade brownie batter instead of box mix?
Absolutely! Homemade brownie batter works beautifully in this recipe and adds a personal touch. Just make sure the batter isn’t too runny so the cups hold their shape when baked.
What if I don’t have rainbow candy belts?
No worries! You can substitute with any colorful chewy candy strips or even use fruit leather ribbons for a homemade twist. The key is to have vibrant colors to mimic the rainbow effect.
Is there a non-dairy alternative for the whipped cream?
Yes, you can use coconut whipped cream or other plant-based whipped toppings to keep this recipe dairy-free without sacrificing the light, fluffy texture.
Can I make these gluten-free?
Simply swap out the brownie mix for a gluten-free version, and double-check that all your candies and toppings are gluten-free. It’s an easy adjustment that keeps the fun intact!
How far in advance can I prepare the dessert?
Prepare the brownie cups a day or two ahead, but add whipped cream and decorations only right before serving. This ensures the cups stay fresh and visually delightful for your guests.
Final Thoughts
There is something truly joyful about making and sharing the Delightful Pot O’ Gold Cups for Your St. Patrick’s Day Bash Recipe. These charming little treats bring whimsy, color, and a wealth of flavor to your table, making your celebration feel even more special. Give them a try at your next St. Paddy’s gathering—you’ll be the star baker everyone talks about!
Print
Delightful Pot O’ Gold Cups for Your St. Patrick’s Day Bash Recipe
- Prep Time: 10 minutes
- Cook Time: 20 minutes
- Total Time: 40 minutes
- Yield: 12 servings
- Category: Dessert
- Method: Baking
- Cuisine: American
Description
Celebrate St. Patrick’s Day with these delightful Pot O’ Gold Cups, a fun and festive treat featuring rich brownie bites topped with fluffy whipped cream, colorful rainbow candy belts, and sparkling gold sanding sugar. Perfect for parties and easy to make in under 40 minutes, these charming dessert cups bring a magical rainbow finish to your holiday bash.
Ingredients
Brownies
- 1 box brownie mix (use your favorite brand)
- Ingredients required as per brownie mix package (typically eggs, oil, and water)
- 1 can cooking spray (for greasing the muffin tin)
Toppings
- 2 cups whipped cream (freshly whipped or store-bought)
- 1 cup rainbow candy belts (cut into strips or fun shapes)
- 1 tablespoon gold sanding sugar (optional, for sparkle)
Instructions
- Preheat Oven: Preheat your oven to 350°F (175°C) and either spray a muffin tin generously with cooking spray or line the cups with parchment paper to prevent sticking.
- Prepare Brownie Batter: In a medium bowl, prepare the brownie mix as directed on the package, usually combining the mix with required eggs, oil, and water until smooth and fully blended.
- Fill Muffin Tin: Spoon the brownie batter into the prepared muffin tin, filling each cup about two-thirds full to allow room for rising during baking.
- Bake Brownies: Place the muffin tin in the preheated oven and bake for approximately 20 minutes, or until a toothpick inserted into the center comes out with a few moist crumbs.
- Cool Brownies: Remove the tin from the oven and let the brownies cool in the pan for a few minutes before gently removing them to a wire rack to cool completely.
- Add Toppings: Once the brownie cups are completely cooled, top each one generously with whipped cream to mimic fluffy clouds. Decorate with strips of rainbow candy belts and sprinkle with gold sanding sugar for a shimmering finish.
Notes
- You can use store-bought whipped cream for convenience or whip your own for a fresher taste.
- Rainbow candy belts can be substituted with any colorful candy or fruit strips to fit your taste or availability.
- If gold sanding sugar is unavailable, colored sugar or edible glitter can be used as alternatives.
- Make sure the brownies are completely cool before adding whipped cream to prevent it from melting.
- These cups can be prepared a few hours ahead and refrigerated until serving.


