
“`html
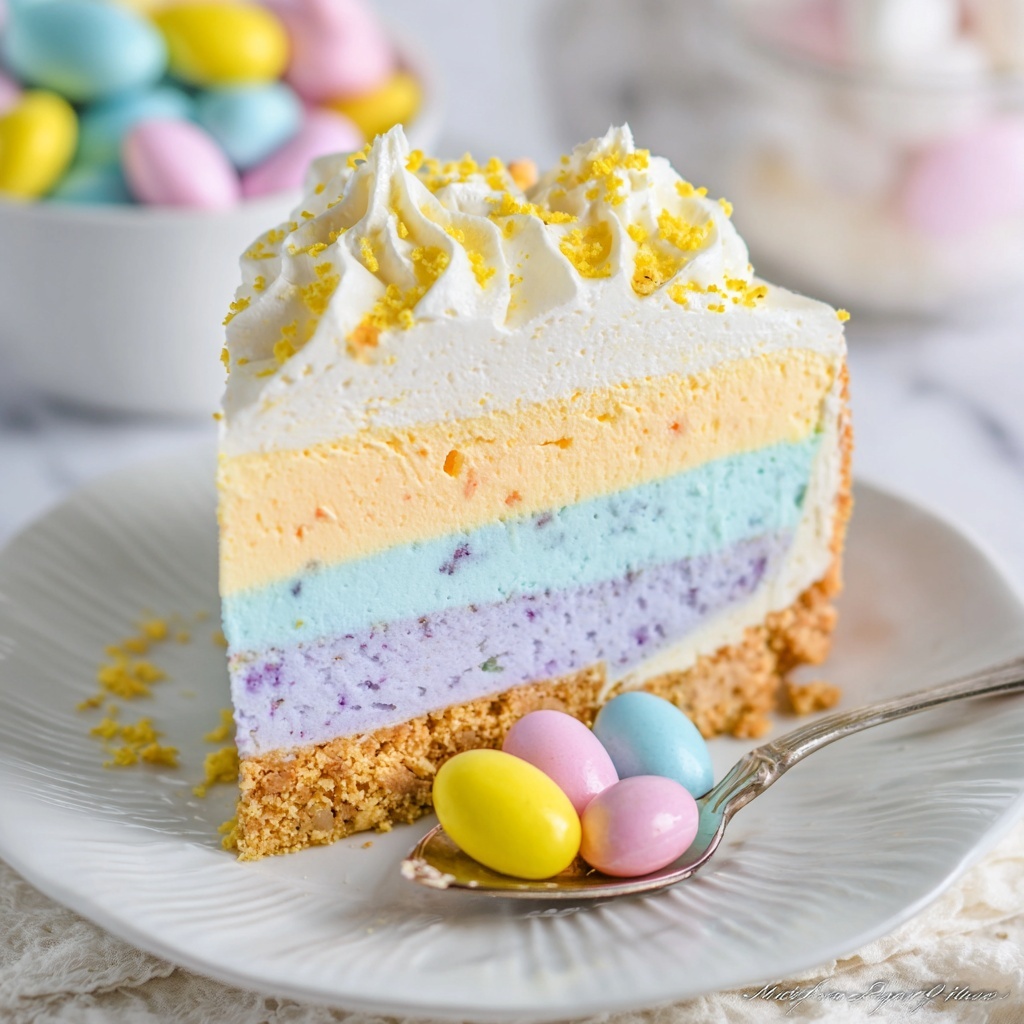
If you’re looking to brighten up your dessert table with a fun and festive treat, this Easter Colorful Jell-O Pie Recipe is exactly what you need. This delightful pie layers vibrant hues of pink, blue, yellow, and purple Jell-O mixed with fluffy whipped cream on a buttery graham cracker crust, creating a fluffy, jiggly masterpiece that is as pretty as it is delicious. Perfect for spring gatherings or any celebration that calls for a burst of color and flavor, this pie combines nostalgic flavors with a fresh, creamy twist you’ll want to make again and again.
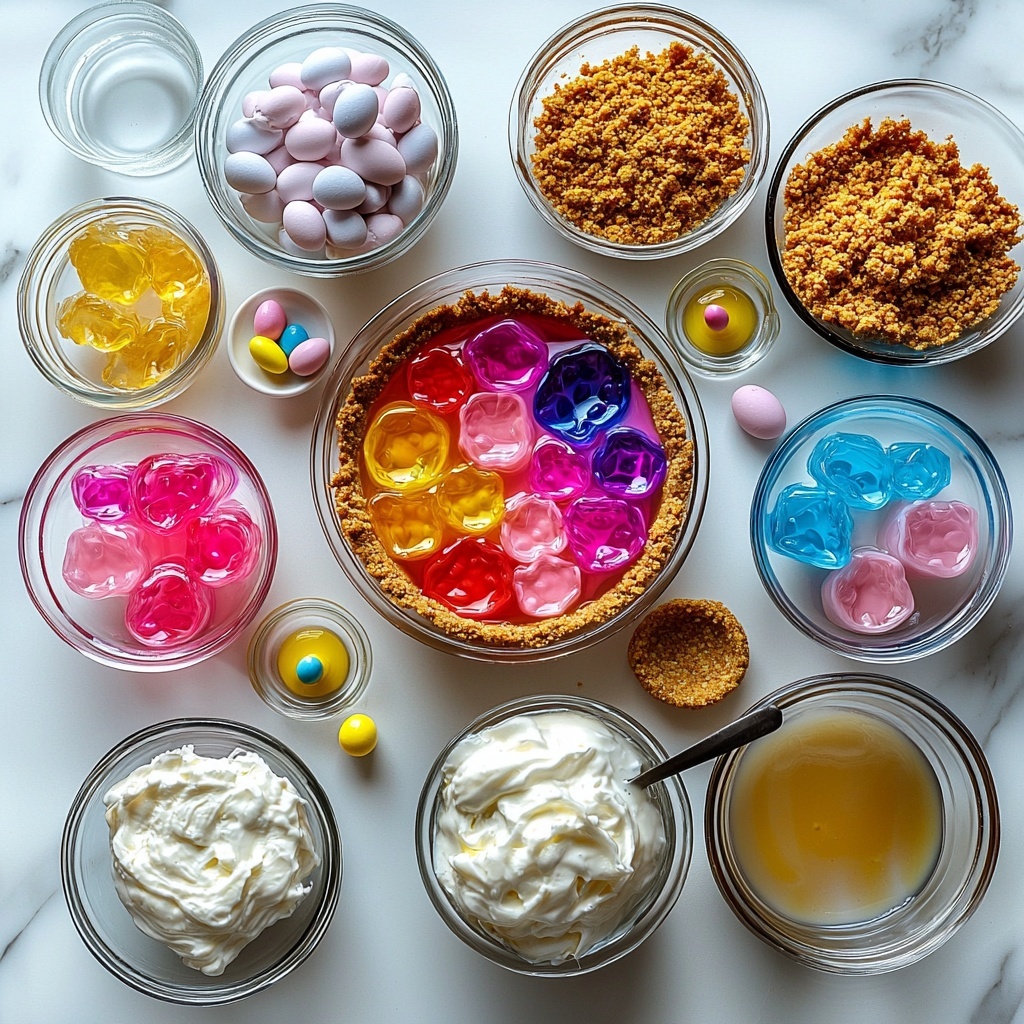
Ingredients You’ll Need
Gathering simple, everyday ingredients is all it takes to whip up this show-stopping Easter Colorful Jell-O Pie Recipe. Each item plays a key role in creating layers of flavor, texture, and vibrant color that come together effortlessly for an impressive dessert.
- Pink Starburst Jell-O (½ package, about 2 ounces): Adds a sweet, fruity pink layer bursting with flavor.
- Blue Jell-O (1½ ounces, ½ package): Creates a cool, refreshing blue layer that perfectly contrasts the other colors.
- Yellow Jell-O (1½ ounces, ½ package): Provides a sunny, tart layer that brightens the pie’s palette.
- Purple Jell-O (1½ ounces, ½ package): Offers a rich, berry-like layer that deepens the pie’s color spectrum.
- Whipped Cream (16 ounces, divided): Lightens and smooths each Jell-O layer, making the pie fluffy and creamy.
- Boiling Water (3 cups): Essential for dissolving the Jell-O powders to create smooth, vibrant gels.
- Cold Water (1⅓ cups, divided): Used to help the Jell-O set properly and achieve the perfect consistency.
- Yellow and Pink Food Dye (optional): Enhances the brightness of the yellow and pink layers for an even more colorful effect.
- Graham Cracker Crumbs (2½ cups): Forms the crispy, buttery base for the pie, balancing the softness of the layers.
- Butter (12 tablespoons or 1½ sticks): Binds the graham cracker crust together and adds richness.
How to Make Easter Colorful Jell-O Pie Recipe
Step 1: Prepare the Crust
Start by melting your butter until it’s fully liquified—using the microwave works perfectly here. Mix the melted butter thoroughly with the graham cracker crumbs until the texture resembles wet sand. Then, press this mixture firmly into the bottom and up the sides of a springform pan, creating a sturdy base that holds all those beautiful layers of Jell-O. Pop the crust into the freezer to firm up while you prepare the layers.
Step 2: Dissolve the Jell-O Powders
Divide each color of Jell-O powder into separate small bowls. Pour ¾ cup of boiling water into each and stir carefully until every bit of powder has fully dissolved with no graininess left behind. This step is crucial for smooth, vibrant, and evenly textured layers.
Step 3: Cool Down the Jell-O Mixtures
Add ⅓ cup of cold water to each bowl and stir again. Then place all the bowls in the fridge for about 20 to 30 minutes. You want the mixtures thickened but not set solid—this thicker consistency will help the whipped cream blend in without the Jell-O fully firming up too soon.
Step 4: Whip It into Creaminess
Once thickened, add 4 ounces of whipped cream to each Jell-O bowl. Stir vigorously until each mixture becomes fluffy and homogenous. This adds a delightful creamy texture and lightens the jiggly layers beautifully.
Step 5: Customize Colors with Food Dye (Optional)
If you want to give your pie colors a little extra pop, add a drop or two of yellow and pink food dye into the corresponding bowls now. Stir well until the color is uniform and streak-free, creating a vibrant, eye-catching palette perfect for Easter.
Step 6: Layer Your Pie
Start by spooning your chosen first color (I personally love beginning with the sunny yellow layer!) evenly over the chilled crust. Freeze the pie for about 5 minutes to help set each layer before adding the next. Repeat this process with every subsequent color until all four layers are beautifully stacked and frozen into a colorful masterpiece.
Step 7: Chill Until Fully Set
Once all layers are in place, let your pie sit in the freezer for at least 3 to 4 hours, or until it is entirely solidified from top to bottom. This chilling step ensures every slice will hold its shape and display those gorgeous, distinct layers perfectly.
Step 8: Garnish and Enjoy!
For an extra touch, spread a generous layer of whipped cream over the top just before serving. Then slice and show off your cheerful, fruity creation—everyone will be amazed by the taste and the colors!
How to Serve Easter Colorful Jell-O Pie Recipe
Garnishes
Enhance your pie with a whipped cream crown or a sprinkle of extra graham cracker crumbs for texture contrast. Fresh berries or pastel-colored sprinkles can add that festive flair perfect for Easter brunch or dessert tables.
Side Dishes
This pie pairs wonderfully with light, fresh sides like a crisp spring salad or a plate of fresh fruit. Its sweet, creamy layers balance well against something refreshing and less sweet, making the overall meal feel nicely rounded and festive.
Creative Ways to Present
Serve your Easter Colorful Jell-O Pie Recipe in clear glass dishes or individual mini springform pans to showcase the vivid layers in every slice. For a fun twist, turn it into colorful parfaits by layering the Jell-O mixtures with whipped cream and graham cracker crumbs in pretty glasses. It’s a playful way to impress guests and share your festive spirit.
Make Ahead and Storage
Storing Leftovers
Cover your pie tightly with plastic wrap or store it in an airtight container to keep it fresh for up to 3 days in the refrigerator. This keeps the pie flavorful and prevents the whipped cream from drying out.
Freezing
You can freeze the pie for up to a week. Wrap it well to avoid freezer burn, and when you’re ready to enjoy, thaw it in the refrigerator overnight. The texture remains lovely and jiggly once fully thawed.
Reheating
This colorful pie is best served chilled, so reheating is not recommended as it will change the texture of the layers. Just let it sit at room temperature for about 10-15 minutes before serving for the perfect softness.
FAQs
Can I use regular Jell-O instead of Pink Starburst flavor?
Absolutely! Regular flavored Jell-O works beautifully. The Pink Starburst simply adds a unique twist, but feel free to choose your favorite flavors to customize the pie.
Is it necessary to use a springform pan?
Using a springform pan is highly recommended because it makes removing the pie without damaging the layers much easier. However, you can use a regular pie dish if you’re careful while serving.
Can I make this pie vegan-friendly?
To make a vegan version, look for plant-based whipped topping alternatives and use gelatin substitutes like agar-agar. Keep in mind that the texture may vary slightly.
What if I don’t have food coloring? Will the pie still look good?
Definitely! The food coloring is optional and mainly for enhancing the natural colors of the Jell-O. Even without it, the pie’s natural Jell-O colors produce a beautifully vibrant dessert.
How long does this pie keep in the fridge?
For the best taste and texture, aim to consume it within 3 days. After that, the layers may begin to lose firmness, and the whipped cream can start to deflate.
Final Thoughts
This Easter Colorful Jell-O Pie Recipe is one of those rare treats that feels both nostalgic and wonderfully fresh, making it a true crowd-pleaser for any occasion. The bright layers, creamy texture, and crisp crust come together in a way that’s as fun to make as it is to eat. So go ahead, give this recipe a try, and get ready to impress your family and friends with your colorful creativity and tasty triumph!
“`
Print
Easter Colorful Jell-O Pie Recipe
- Prep Time: 20 minutes
- Cook Time: 0 minutes
- Total Time: 4 hours 20 minutes
- Yield: 8 servings
- Category: Dessert
- Method: No-Cook
- Cuisine: American
Description
Easter Jello-O Pie is a vibrant, layered dessert perfect for spring celebrations that combines colorful Jell-O flavors with a buttery graham cracker crust and creamy whipped topping. This no-bake pie offers a fun and easy way to create a festive treat that delights both kids and adults.
Ingredients
Crust
- 2½ cups Graham Cracker Crumbs
- 12 tbsp Butter (1½ sticks), melted
Jell-O Layers
- ½ package Pink Starburst Jell-O (approximately 1¾ ounces)
- 1½ ounces Blue Jell-O (½ package)
- 1½ ounces Yellow Jell-O (½ package)
- 1½ ounces Purple Jell-O (½ package)
- 3 cups Boiling Water (divided into ¾ cup portions)
- 1⅓ cup Cold Water (divided into ⅓ cup portions)
- 16 ounces Whipped Cream, divided (4 ounces per Jell-O color)
- Yellow Food Dye (optional)
- Pink Food Dye (optional)
Instructions
- Melt Butter: Melt the butter in the microwave until it is fully liquefied, ensuring an even mix with the crust crumbs.
- Prepare Crust Mixture: In a medium bowl, combine the melted butter with graham cracker crumbs and mix until the consistency resembles thick, damp sand.
- Form Crust: Press the crust mixture evenly into the bottom and up the sides of a springform pan to create a firm base.
- Chill Crust: Place the crust in the freezer to set while preparing the Jell-O layers.
- Dissolve Jell-O Powders: Divide each Jell-O color powder into separate small bowls. Add ¾ cup boiling water to each and stir well until all powder is fully dissolved with no graininess remaining.
- Add Cold Water: Stir ⅓ cup cold water into each bowl of dissolved Jell-O to bring the mixture to room temperature.
- Chill Jell-O Mixtures: Refrigerate the bowls for 20-30 minutes until each mixture begins to thicken but does not fully set.
- Combine with Whipped Cream: Add 4 ounces of whipped cream to each thickened Jell-O bowl and vigorously mix until fully combined, creating a creamy texture.
- Add Food Dye (Optional): If desired, incorporate yellow and pink food dye into the corresponding bowls to intensify color, stirring until evenly distributed.
- Layer Jell-O in Crust: Pour the first Jell-O layer (yellow recommended) evenly over the chilled crust, then return the pie to the freezer for 5 minutes to set. Repeat layering with remaining Jell-O colors, freezing for 5 minutes between each layer to firm up.
- Freeze Pie: After all layers are added, freeze the pie for 3-4 hours or until completely solidified throughout.
- Serve: Remove the pie from the freezer, optionally top with additional whipped cream, slice, and enjoy your festive Easter Jello-O Pie!
Notes
- Use a springform pan to easily remove the pie without damaging the crust or layers.
- Do not let Jell-O mixtures fully set before adding whipped cream to ensure proper blending.
- The optional food dyes help create brighter, more vibrant layers for a visually stunning pie.
- Freezing between layers helps maintain distinct colors and prevents mixing.
- This recipe serves 8 and is best stored in the freezer until ready to serve.


