
“`html
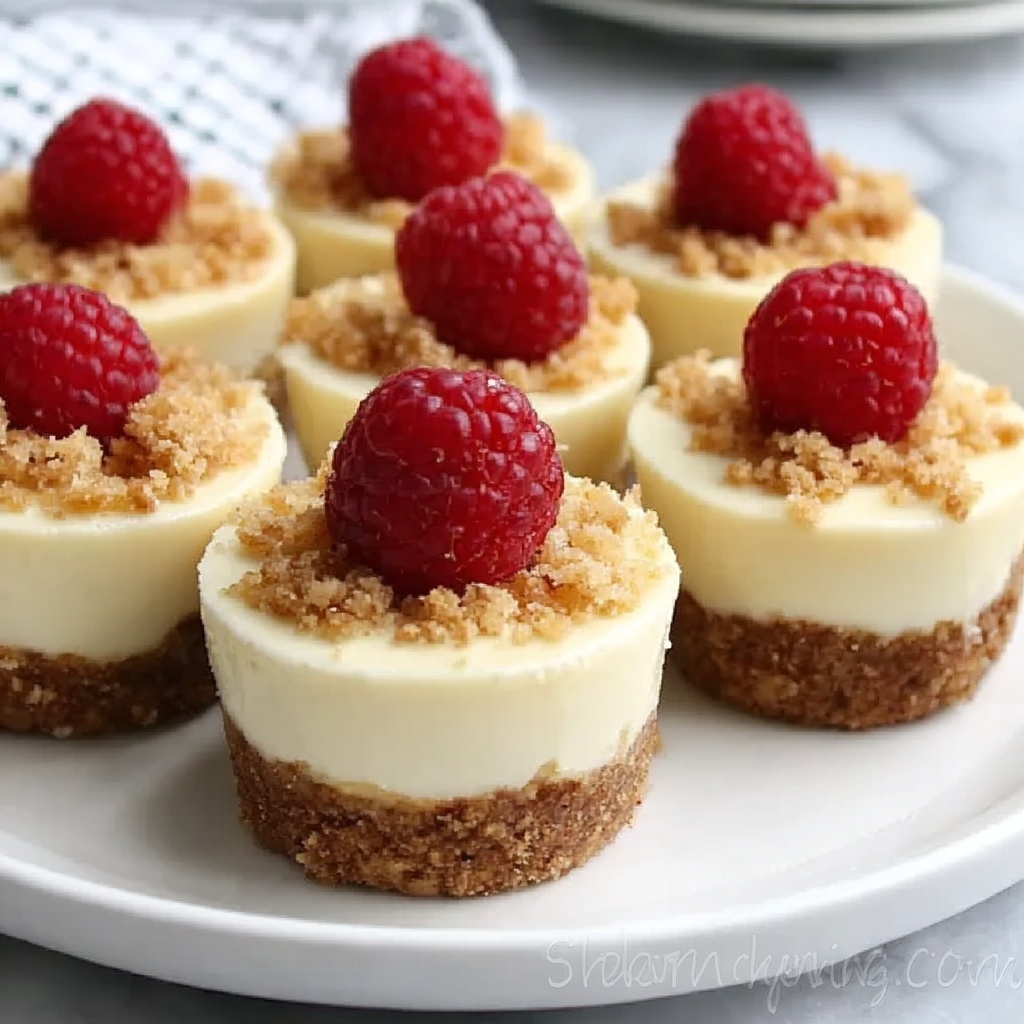
If you’re looking for a delightful treat that feels both indulgent and perfectly tailored to your dietary needs, this Gluten-Free Mini Cheesecakes Recipe is an absolute winner. Each bite-sized cheesecake bursts with creamy, dreamy goodness atop a crunchy gluten-free graham cracker crust, making these little desserts not only gorgeous but also irresistibly delicious. Whether you’re serving them up for a special occasion or indulging a sweet craving, these mini cheesecakes combine simplicity and elegance in every mouthful.
Ingredients You’ll Need
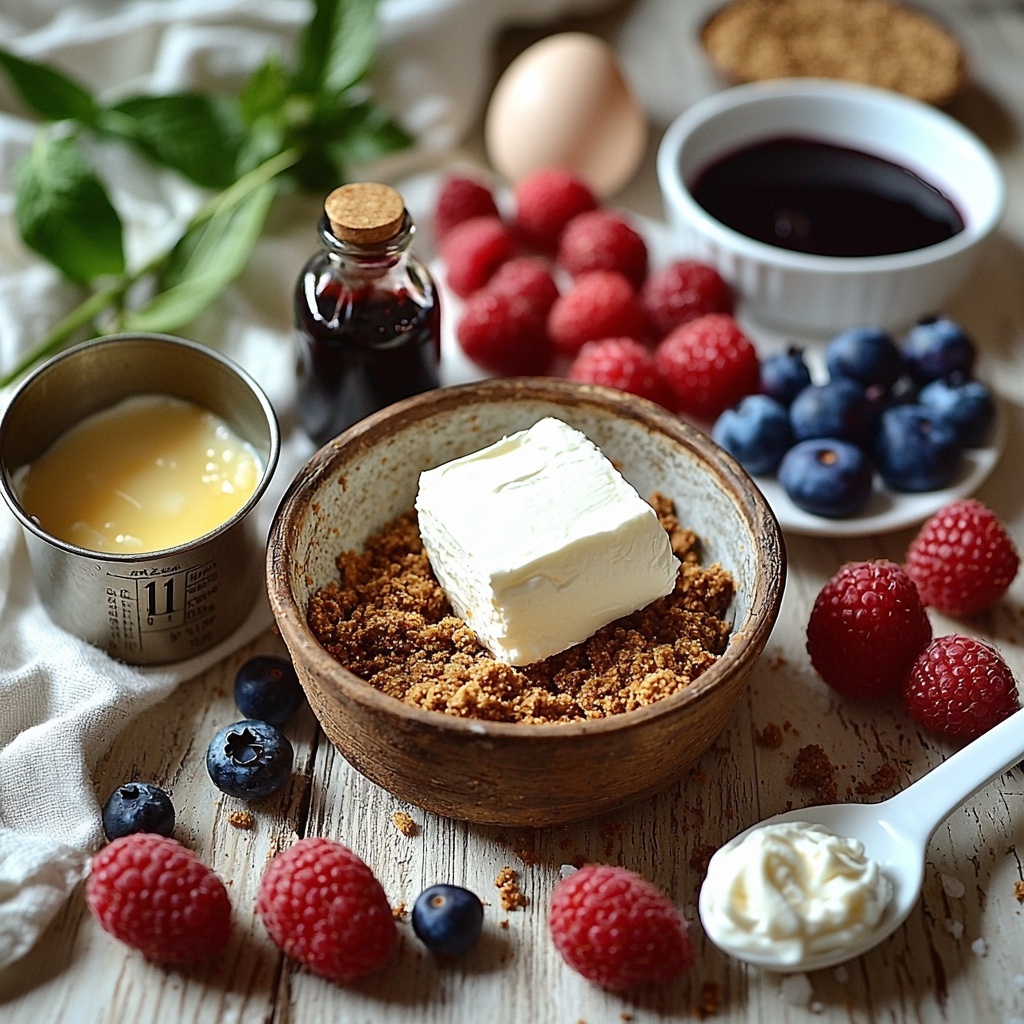
This Gluten-Free Mini Cheesecakes Recipe relies on just a handful of simple ingredients, each playing a crucial role in creating the perfect balance of texture and flavor. From the crumbly, buttery crust to the silky, rich cheesecake filling, every component is essential for that oh-so-satisfying result.
- 1 1/2 cups gluten-free graham cracker crumbs: Provides that classic cheesecake crust crunch without gluten worries.
- 4 tablespoons unsalted butter, melted: Binds the crust crumbs together and adds a rich buttery taste.
- 2 tablespoons granulated sugar: Sweetens the crust ever so slightly to balance textures.
- 16 oz cream cheese, softened: The creamy base that makes the cheesecake rich and luscious.
- 1/2 cup granulated sugar: Sweetens the cheesecake filling perfectly without overpowering the flavor.
- 1 teaspoon pure vanilla extract: Adds a fragrant warmth and depth to the cheesecake batter.
- 2 large eggs: Provides structure and silkiness to the cheesecake texture.
- 2 tablespoons sour cream: Enhances creaminess and adds a subtle tang for complexity.
- Pinch of salt: Balances sweetness and enhances all the other flavors beautifully.
- Fresh berries, whipped cream, chocolate drizzle: Optional garnishes that bring color, freshness, and extra indulgence to your mini cheesecakes.
How to Make Gluten-Free Mini Cheesecakes Recipe
Step 1: Prepare the Oven and Muffin Tin
Start by preheating your oven to 325°F (160°C) to ensure it’s at the perfect temperature for gentle baking. Line a 12-cup muffin tin with paper liners to make removing the mini cheesecakes a breeze later. This step sets the foundation for the perfect shape and texture.
Step 2: Make the Crust Mixture
In a mixing bowl, combine the gluten-free graham cracker crumbs, melted butter, and 2 tablespoons of sugar. Mix until the crumbs are evenly coated and crumbly but moist. This is the start of your crunchy, buttery base — press it firmly into each muffin cup so every mini cheesecake has a solid, flavorful foundation.
Step 3: Prepare the Cheesecake Filling
In a large bowl, beat the softened cream cheese with 1/2 cup sugar until the mixture is perfectly smooth and creamy. Add in the vanilla extract, then crack in the eggs one at a time, mixing gently after each to keep the batter smooth without overworking it. Finally, fold in sour cream and a pinch of salt to create that signature rich, tangy cheesecake flavor.
Step 4: Assemble and Bake
Spoon the cheesecake batter over each crust-filled muffin cup, filling them about three-quarters full to leave room for gentle rising. Bake for 18 to 20 minutes, watching closely for centers that set but still have a slight jiggle. This texture means your cheesecakes will be creamy, not dry — just the way they should be.
Step 5: Cool and Chill
Allow your mini cheesecakes to cool in the pan to room temperature, then transfer them to the refrigerator for at least 2 hours to fully set. This chilling step is crucial to develop their silky texture and to make them easier to handle for serving later.
Step 6: Add Toppings and Serve
Once chilled, top each mini cheesecake with fresh berries, a dollop of whipped cream, or a drizzle of chocolate. Each topping adds a burst of flavor and makes presentation shine, perfect for wowing guests or enjoying a special homemade dessert yourself.
How to Serve Gluten-Free Mini Cheesecakes Recipe
Garnishes
Fresh berries like strawberries, blueberries, and raspberries complement the creamy cheesecake beautifully with their natural sweetness and vibrant colors. Whipped cream adds an extra layer of softness and indulgence, while a drizzle of melted chocolate provides a rich, decadent finish. Feel free to mix and match toppings for your perfect bite.
Side Dishes
These mini cheesecakes pair wonderfully with light and refreshing accompaniments such as a small scoop of sorbet or a citrusy fruit salad. A cup of freshly brewed coffee or a glass of dessert wine can also elevate the experience, making dessert feel extra celebratory and cozy.
Creative Ways to Present
Serve these delightful mini cheesecakes on a tiered dessert stand to create an eye-catching centerpiece at parties. You can also place each cheesecake in small decorative cupcake wrappers to enhance their festive charm. For a personal touch, add edible flowers or a sprinkle of crushed toasted nuts on top to impress your guests.
Make Ahead and Storage
Storing Leftovers
Leftover mini cheesecakes can be kept covered in the refrigerator for up to 4 days. Store them in an airtight container to maintain their creamy texture and prevent them from absorbing any fridge odors. Always bring them to room temperature for a few minutes before serving for best flavor.
Freezing
These mini cheesecakes freeze beautifully. Place them in a single layer on a baking sheet and freeze until solid, then transfer to a freezer-safe container or bag. They can be frozen for up to 2 months. Thaw them overnight in the refrigerator before serving to retain their perfect texture.
Reheating
Reheating isn’t typically necessary or recommended for cheesecakes, as they are best enjoyed chilled. However, if you prefer a slightly softened texture, let them sit at room temperature for 15 to 20 minutes before enjoying. Avoid microwaving as it can alter their texture and cause the filling to become grainy.
FAQs
Can I use a different gluten-free crust for this recipe?
Absolutely! While gluten-free graham cracker crumbs are traditional and delicious, you can experiment with crushed gluten-free cookies or even nut-based crusts like almond flour for a slightly different texture and flavor.
Is it possible to make these mini cheesecakes dairy-free?
For a dairy-free version, substitute dairy-free cream cheese and butter alternatives. The texture might alter slightly, but you’ll still get a wonderful creamy cheesecake experience that fits your dietary needs.
How do I know when the mini cheesecakes are done baking?
You want to see the edges set and possibly starting to pull away slightly from the paper liners, while the centers should still have a slight jiggle when you gently shake the pan. This indicates a creamy, not overbaked, cheesecake.
Can this recipe be doubled or halved easily?
Yes, this recipe scales well. Just adjust your muffin tins or use multiple pans accordingly, and keep an eye on the baking time – it might need slight adjustments depending on how full the tins are.
What are some fun toppings besides berries and chocolate?
Try caramel sauce, chopped nuts, toasted coconut, or even a spoonful of fruit preserves. These options add unique textures and flavors, making your gluten-free mini cheesecakes even more special.
Final Thoughts
There’s something truly comforting and exciting about whipping up a batch of these Gluten-Free Mini Cheesecakes Recipe treats. They capture that perfect balance of ease and elegance, guaranteeing smiles at every bite whether for family, friends, or just a well-deserved personal indulgence. Give them a try and watch how quickly they become a beloved staple in your dessert repertoire!
“`
Print
Gluten-Free Mini Cheesecakes Recipe
- Prep Time: 20 minutes
- Cook Time: 20 minutes
- Total Time: 2 hours 40 minutes
- Yield: 12 mini cheesecakes
- Category: Dessert
- Method: Baking
- Cuisine: American
- Diet: Gluten Free
Description
These Gluten-Free Mini Cheesecakes are a delicious, individual-sized dessert perfect for any occasion. Featuring a crunchy gluten-free graham cracker crust and a creamy, smooth cheesecake filling, they are topped with fresh berries, whipped cream, or a chocolate drizzle for an extra special touch. Baked to perfection and chilled for a creamy texture, these mini cheesecakes are easy to make and delightful to eat.
Ingredients
Crust
- 1 1/2 cups gluten-free graham cracker crumbs
- 4 tablespoons unsalted butter, melted
- 2 tablespoons granulated sugar
Cheesecake Filling
- 16 oz cream cheese, softened
- 1/2 cup granulated sugar
- 1 teaspoon pure vanilla extract
- 2 large eggs
- 2 tablespoons sour cream
- Pinch of salt
Toppings
- Fresh berries
- Whipped cream
- Chocolate drizzle
Instructions
- Prepare the oven and muffin tin: Preheat your oven to 325°F (160°C) and line a 12-cup muffin tin with paper liners to ensure easy removal of the mini cheesecakes.
- Make the crust mixture: In a mixing bowl, combine the gluten-free graham cracker crumbs, melted unsalted butter, and 2 tablespoons of granulated sugar. Mix thoroughly until the crumbs are evenly coated and slightly moist.
- Form the crust bases: Distribute the crust mixture evenly among the 12 muffin cups. Press the crumbs firmly into the base of each cup to create a compact crust layer. Set aside while preparing the filling.
- Beat the cream cheese and sugar: In a large mixing bowl, beat the softened cream cheese together with 1/2 cup granulated sugar until the mixture is smooth and creamy, free of lumps.
- Add remaining filling ingredients: Add the vanilla extract, then incorporate the eggs one at a time, beating gently after each addition. Stir in the sour cream and a pinch of salt. Mix just until combined to avoid overmixing, which can affect texture.
- Fill the crusts: Spoon the cheesecake batter over the prepared crusts in the muffin tin, filling each about three-quarters full to leave space for rising.
- Bake the mini cheesecakes: Place the muffin tin in the preheated oven and bake for 18 to 20 minutes. The centers should be set but still slightly jiggly to ensure a creamy texture once cooled.
- Cool and chill: Remove from the oven and allow the mini cheesecakes to cool to room temperature in the pan. After cooling, transfer them to the refrigerator and chill for at least 2 hours to fully set and develop flavor.
- Add toppings and serve: Just before serving, top each mini cheesecake with fresh berries, whipped cream, and a drizzle of chocolate as desired for added flavor and presentation.
Notes
- Ensure the cream cheese is softened to room temperature for a smooth batter without lumps.
- Do not overmix the batter after adding eggs to prevent cracks and dense texture.
- Chilling the cheesecakes for at least 2 hours is essential for proper set and flavor development.
- You can substitute sour cream with Greek yogurt for a tangier flavor.
- Use paper liners that fit snugly in the muffin tin to prevent sticking.
- Store leftover mini cheesecakes in an airtight container in the refrigerator for up to 3 days.


