
“`html
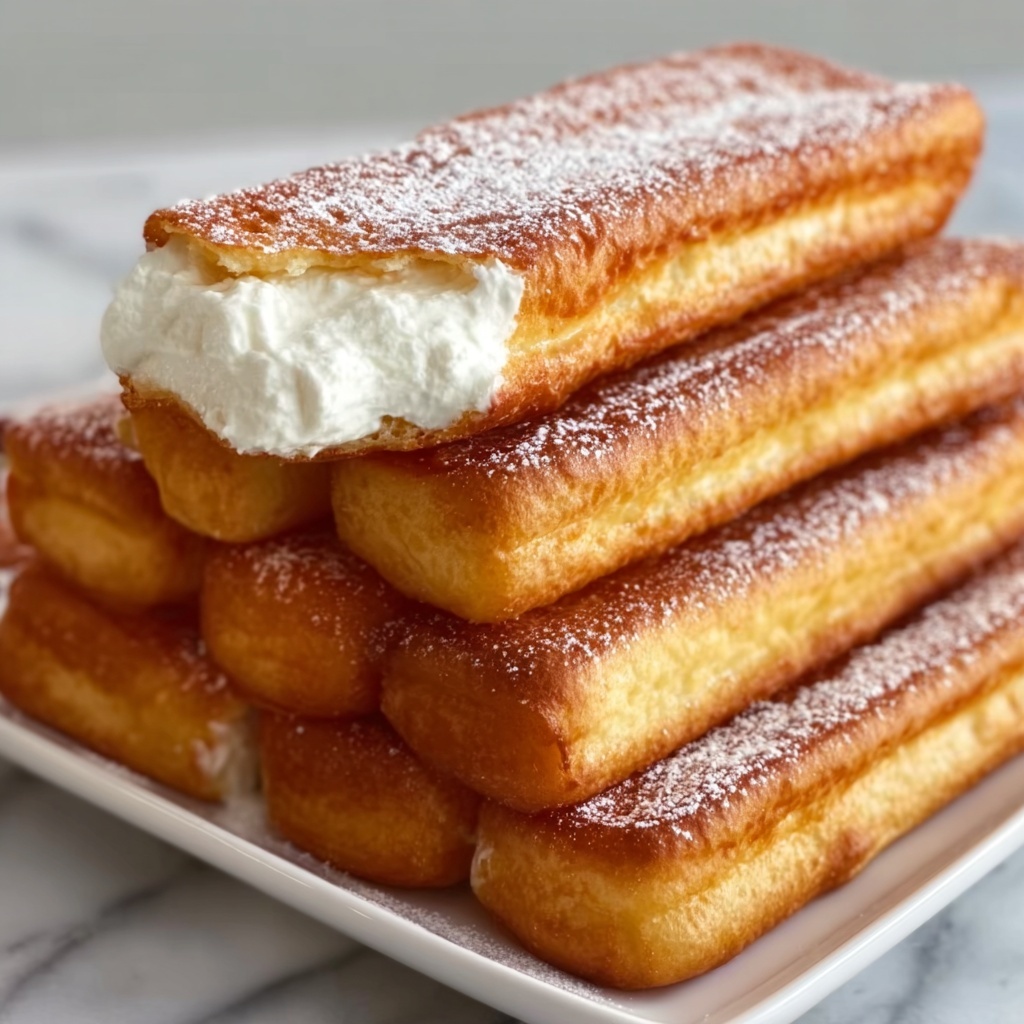
If you’ve ever dreamed of recreating a nostalgic classic right in your own kitchen, this Homemade Twinkies Recipe is about to become your new favorite. These golden, spongy cakes with luscious vanilla cream inside carry all the charm of the original snack cake, but with the added warmth and deliciousness only homemade treats can bring. Perfectly balanced in sweetness and texture, making these at home lets you savor every bite with pride and delight.
Ingredients You’ll Need
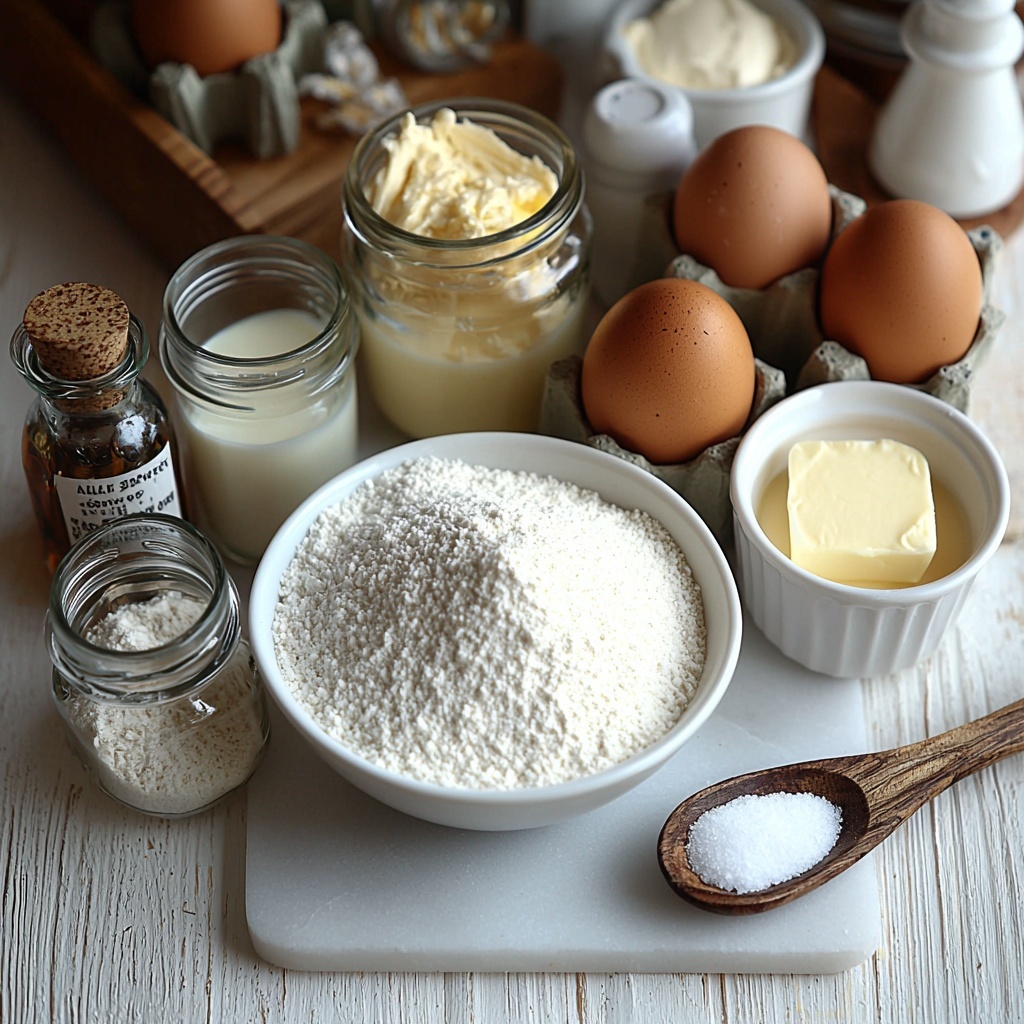
Simple, straightforward ingredients come together to create the perfect balance of lightness, sweetness, and creaminess in this Homemade Twinkies Recipe. Each component plays its part—flour and leaveners give structure, butter and sugar build richness, while eggs and milk ensure tenderness and moisture.
- 1 cup all-purpose flour: The foundation for our soft, spongy cake texture.
- 1 teaspoon baking powder: Helps the cakes rise light and fluffy.
- 1/2 teaspoon baking soda: Balances acidity and promotes even browning.
- 1/4 teaspoon salt: Enhances all the flavors without overpowering.
- 1/2 cup unsalted butter, softened: Adds richness and tenderness to the cake.
- 1 cup granulated sugar: Sweetens the batter and helps create a delicate crumb.
- 2 large eggs: Bring structure, moisture, and a bit of lift.
- 1 teaspoon vanilla extract: Infuses a warm, inviting aroma and flavor.
- 1/2 cup milk: Moistens the batter for tender softness.
- Cream filling (powdered sugar, butter, vanilla extract, and milk for consistency): The unforgettable sweet center that makes these Twinkies unmistakable.
How to Make Homemade Twinkies Recipe
Step 1: Preheat and Prepare Dry Ingredients
Start by preheating your oven to 350°F (175°C). In a bowl, whisk together the all-purpose flour, baking powder, baking soda, and salt. This dry mix is essential for a balanced rise and structure in your Twinkies.
Step 2: Cream Butter and Sugar
In a separate bowl, beat the softened unsalted butter and granulated sugar until they become light and fluffy—about three minutes. This step is key for creating a tender crumb and a slight golden color once baked.
Step 3: Add Eggs and Vanilla
Add the eggs one at a time to your butter and sugar mixture, mixing well after each addition. This ensures your batter stays smooth and incorporates plenty of air. Then, stir in the vanilla extract to give your cakes that classic comforting flavor.
Step 4: Combine Wet and Dry Ingredients
Gradually add your dry ingredients to the wet mixture, alternating with the milk. Start and end with the dry ingredients, folding everything together carefully. This alternating method prevents overmixing and keeps your batter silky and smooth.
Step 5: Fill Molds and Bake
Spoon the batter into Twinkie molds or greased cupcake pans, filling each about two-thirds full to leave room for rising. Bake for 20 to 25 minutes until the cakes are golden brown and a toothpick inserted in the center comes out clean. This ensures your Twinkies are perfectly baked—light but sturdy enough to hold the cream filling.
Step 6: Cool and Fill
Once baked, allow your cakes to cool completely. This cooling step is crucial to keep your cream filling from melting once piped inside. Using a piping bag, carefully fill each cake with the sweet vanilla cream filling to bring the signature Homemade Twinkies Recipe to life.
How to Serve Homemade Twinkies Recipe
Garnishes
A light dusting of powdered sugar on top of each filled Twinkie enhances the classic look and adds a gentle sweetness. You can also try drizzling melted chocolate over them or sprinkling a hint of cinnamon for a comforting twist.
Side Dishes
Homemade Twinkies naturally steal the show but pairing them with a scoop of vanilla ice cream or fresh berries creates a delightful contrast. A cup of hot coffee or tea also perfectly complements the soft cake and creamy filling, balancing sweetness with warmth.
Creative Ways to Present
For parties or gatherings, arrange your Homemade Twinkies Recipe treats in a fun display by stacking them in a pyramid or serving them with skewers alongside fruit for a playful, snackable dessert buffet. Wrapping individual Twinkies in parchment paper tied with a ribbon adds charm if gifting.
Make Ahead and Storage
Storing Leftovers
Store your Homemade Twinkies in an airtight container in the refrigerator for 3 to 4 days. Keeping them chilled preserves the fresh cream filling and prevents the cakes from drying out, so every bite stays just as delicious as the first.
Freezing
You can freeze your homemade Twinkies by wrapping each one individually in plastic wrap and then placing them in a freezer-safe bag. They keep well for up to one month. When you’re ready to enjoy, thaw them overnight in the refrigerator to maintain the perfect texture.
Reheating
To enjoy a soft, fresh taste after refrigeration, let your Twinkies come to room temperature before serving. Avoid microwaving as it can melt the cream filling unevenly—room temperature brings out the ideal balance of moist cake and creamy center.
FAQs
Can I use cupcake pans instead of Twinkie molds?
Absolutely! Greased cupcake pans work perfectly when Twinkie molds aren’t available. Just fill each cup about two-thirds full to allow enough room for the cakes to rise beautifully.
Is the cream filling difficult to make?
Not at all! The cream filling is a simple blend of powdered sugar, butter, vanilla extract, and milk, whipped to creamy perfection. It’s an easy step that makes all the difference in authenticity and flavor.
Can I make this recipe gluten-free?
Yes, by substituting all-purpose flour with a gluten-free flour blend that includes xanthan gum, you can enjoy Homemade Twinkies Recipe without gluten. Just keep the rest of the ingredients the same for best results.
How long does it take to fill the Twinkies?
Once the cakes have completely cooled, filling them with the cream using a piping bag usually takes about 10 to 15 minutes, depending on how many you’re making. It’s a fun, hands-on step that really brings your Twinkies to life.
Can I add flavors other than vanilla to the cream filling?
Definitely! You can experiment with flavors like almond, lemon, or even cocoa powder to customize your cream filling. Just start with a small amount of extract or flavoring to keep the balance right.
Final Thoughts
This Homemade Twinkies Recipe is more than just a nostalgic treat—it’s a way to bring a bit of magic and homemade love to your kitchen. Each step creates a cake that delights with every bite, soft and sweet with that iconic creamy filling. I encourage you to try this recipe yourself; the joy of biting into a warm, freshly made Twinkie is simply unbeatable. Happy baking!
“`
Print
Homemade Twinkies Recipe
- Prep Time: 15 minutes
- Cook Time: 25 minutes
- Total Time: 40 minutes
- Yield: 12 servings
- Category: Dessert
- Method: Baking
- Cuisine: American
Description
This homemade Twinkies recipe provides a delightful twist on the classic American snack cake with a soft and fluffy vanilla sponge cake filled with a creamy, sweet filling. Perfect for a nostalgic treat or a fun baking project, these Twinkies are baked to golden perfection and filled with a smooth vanilla cream that mimics the iconic flavor.
Ingredients
Cake
- 1 cup all-purpose flour
- 1 teaspoon baking powder
- 1/2 teaspoon baking soda
- 1/4 teaspoon salt
- 1/2 cup unsalted butter, softened
- 1 cup granulated sugar
- 2 large eggs
- 1 teaspoon vanilla extract
- 1/2 cup milk
Cream Filling
- 1 cup powdered sugar
- 1/2 cup unsalted butter, softened
- 1 teaspoon vanilla extract
- 2–3 tablespoons milk (adjust for desired consistency)
Instructions
- Preheat the oven: Set your oven to 350°F (175°C) to ensure it reaches the perfect temperature for baking the cakes.
- Combine dry ingredients: In a bowl, mix the all-purpose flour, baking powder, baking soda, and salt thoroughly to prepare the dry base for your batter.
- Cream butter and sugar: In a separate large bowl, beat the softened butter and granulated sugar together until the mixture is light and fluffy, which usually takes about 3 minutes. This step helps create a soft texture in the cake.
- Add eggs: Incorporate eggs one at a time into the butter-sugar mixture, beating well after each addition to fully combine and add structure to the batter.
- Mix in vanilla extract: Stir in the vanilla extract to infuse the batter with classic vanilla flavor.
- Combine wet and dry ingredients: Gradually add the dry flour mixture to the wet ingredients, alternating with the milk. Start and end with the flour mixture, stirring gently until just combined. Be careful not to overmix to keep the cake tender.
- Fill molds: Spoon the batter into Twinkie molds or greased cupcake pans, filling each about two-thirds full to allow room for the cakes to rise.
- Bake: Place the molds in the preheated oven and bake for 20-25 minutes. The cakes are done when they turn golden brown and a toothpick inserted into the center comes out clean.
- Cool completely: Remove the cakes from the oven and let them cool thoroughly before filling, which prevents the cream filling from melting.
- Prepare cream filling and fill cakes: Beat powdered sugar, softened butter, vanilla extract, and milk until smooth and fluffy. Using a piping bag, fill the cooled cakes by injecting the cream into the center, mimicking the classic Twinkie filling.
- Serve and enjoy: Your homemade Twinkies are now ready to be enjoyed fresh for a delicious treat.
Notes
- For best results, ensure all butter is softened to room temperature before mixing.
- You can substitute milk with buttermilk for a slightly tangier flavor and a more tender cake.
- Use a piping bag with a long narrow tip for easier filling of the cakes.
- Store homemade Twinkies in an airtight container in the refrigerator for up to 3 days to maintain freshness.
- If Twinkie molds are unavailable, cupcake pans work perfectly as an alternative.
