Description
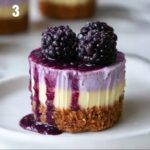
These Mini Blackberry Lavender Cheesecakes are a delightful fusion of creamy cheesecake filling infused with delicate lavender and a vibrant blackberry topping. The graham cracker crust adds a crunchy base, while the whipped cream topping enhances the texture and flavor, making them an elegant dessert perfect for any occasion.
Ingredients
Scale
Blackberry Topping
- 6 oz (180g) blackberries, pureed and strained
- 5 tbsp (65g) sugar
- 2 1/2 tsp cornstarch
Crust
- 3/4 cup (100g) graham cracker crumbs
- 2 tbsp (26g) sugar
- 3 tbsp (42g) butter, melted
Cheesecake Filling
- 12 oz (339g) cream cheese, room temperature
- 1/2 cup (104g) sugar
- 1 1/2 tbsp (12g) flour
- 1/4 cup (58g) sour cream
- 2 tsp lavender extract
- 1/2 tsp vanilla extract
- 2 large eggs, room temperature
- Violet gel icing color, optional
Whipped Cream Topping
- 1/2 cup (120ml) heavy whipping cream, cold
- 4 tbsp (29g) powdered sugar
- 1/2 tsp vanilla extract
- 12-14 blackberries (for garnishing)
Instructions
- Prepare the Blackberry Topping: Puree blackberries in a food processor and strain to remove seeds for a smooth sauce base.
- Cook the Blackberry Mixture: Combine the blackberry puree, sugar, and cornstarch in a saucepan. Cook over medium heat, stirring constantly until the mixture thickens to a sauce consistency. Remove from heat and set aside to cool.
- Preheat the Oven: Heat the oven to 325°F (162°C) to prepare for baking the cheesecakes.
- Prepare the Crust: In a bowl, mix graham cracker crumbs, sugar, and melted butter until the mixture resembles wet sand. Press this mixture evenly into cupcake liners inside a muffin pan. Bake for 5 minutes to set the crust, then remove from oven.
- Prepare the Cheesecake Filling: Using a mixer, blend the cream cheese, sugar, and flour until smooth and creamy. Add sour cream, lavender extract, and vanilla extract, mixing until just combined.
- Add Eggs: Incorporate the eggs one at a time, mixing gently after each to maintain a smooth batter without overmixing. Optionally, add violet gel icing color for a lavender hue.
- Fill the Cups: Spoon the cheesecake batter over the pre-baked crusts in the cupcake liners, filling each almost to the top.
- Bake: Place the muffin pan in the preheated oven and bake the cheesecakes for 18-20 minutes until the edges are set but the center still slightly jiggles. Then turn off the oven and let the cheesecakes cool inside for 10 minutes.
- Cool Gradually: Open the oven door slightly and allow the cheesecakes to cool gradually for about 30 minutes to prevent cracking. Afterward, transfer to the refrigerator to chill completely.
- Top with Blackberry Sauce: Once cooled, spoon the prepared blackberry sauce evenly over each mini cheesecake.
- Make Whipped Cream: In a cold mixing bowl, whip the heavy cream with powdered sugar and vanilla extract until stiff peaks form, ensuring a fluffy and sweet topping.
- Pipe Whipped Cream and Garnish: Use a piping bag to decorate each cheesecake with whipped cream. Garnish with 1 fresh blackberry on top of each for an elegant finish.
Notes
- Ensure cream cheese and eggs are at room temperature for a smoother batter.
- Straining the blackberry puree removes seeds for a more refined topping.
- Do not overbake the cheesecakes to avoid cracks; they should slightly jiggle when removed from oven.
- Use fresh blackberries for garnish to enhance presentation and flavor.
- Lavender extract can be omitted or reduced if you prefer a milder flavor.
- Gel icing color is optional and mainly for aesthetic enhancement.