

If you’ve ever wished you could enjoy rich, chocolaty sugar cookies that hold their shape perfectly without spreading into one another, this No-Spread Chocolate Sugar Cookie Dough Recipe is your new best friend. It gives you tender, flavorful cookies with that irresistible cocoa kick, all while keeping their delightful edges sharp and defined. Whether you’re stamping messages on them or just craving a perfectly shaped chocolate treat, this recipe delivers that classic sugar cookie comfort with a delicious twist you’ll want to make again and again.
Ingredients You’ll Need
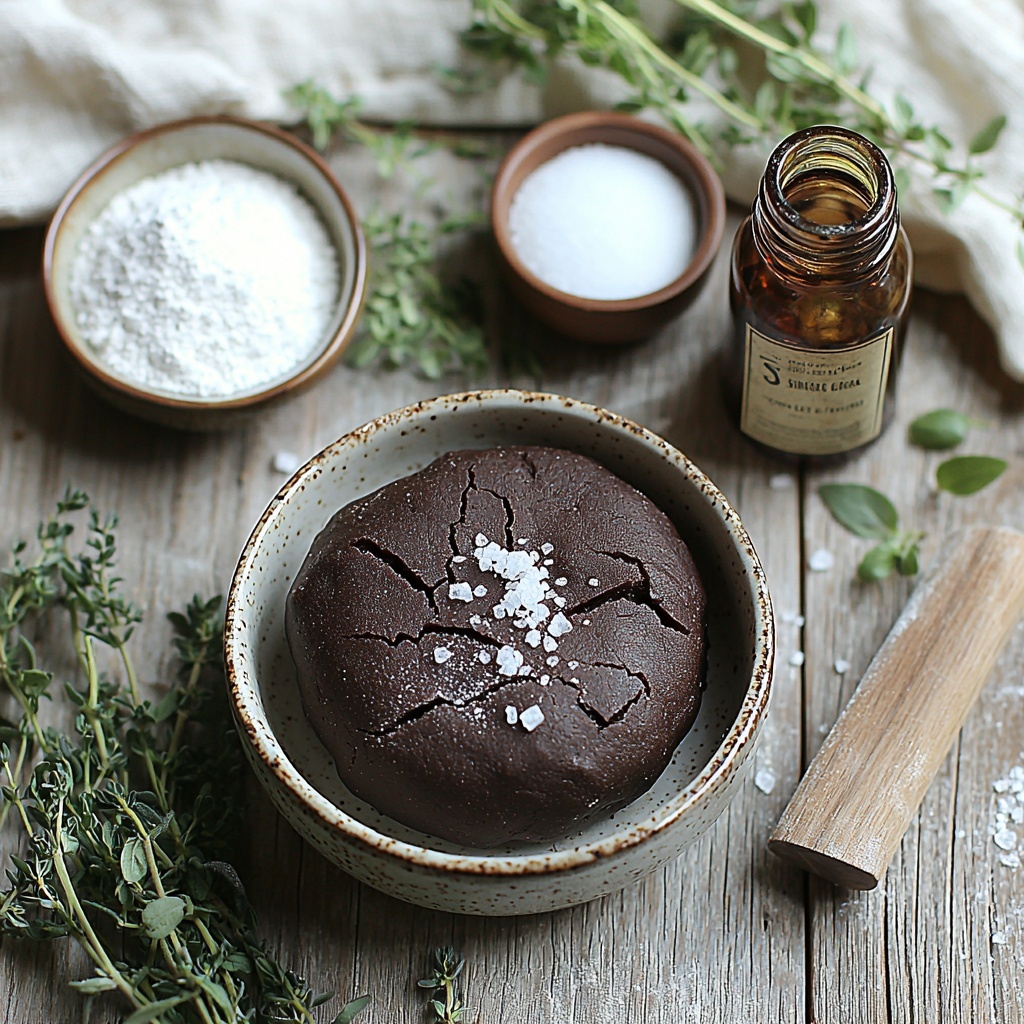
These straightforward ingredients combine simply but cleverly to create a chocolate cookie dough that’s both rich in flavor and wonderfully manageable in texture. Each item plays its part, from the sugar’s sweetness to the cream of tartar’s role in maintaining structure, making this a foolproof dough.
- Powdered sugar (1 cup): Helps create a tender crumb and smooth texture without grittiness.
- Cream of tartar (1/4 tsp): Adds a subtle tang and helps stabilize the dough to keep it from spreading.
- Coarse Kosher salt (1/8 tsp): Balances sweetness and enhances the chocolate flavor.
- Vanilla extract (1/2 tsp): Adds warmth and depth, rounding out the chocolate notes beautifully.
- Milk (2 1/2 – 3 tbsp): Adjusts dough consistency for perfect rollability without stickiness.
- No-Spread Chocolate Sugar Cookie Dough (1/2 recipe): The star dough base that holds shape remarkably well while baking.
How to Make No-Spread Chocolate Sugar Cookie Dough Recipe
Step 1: Prepare the Chocolate Cookie Dough
Start by making half of the No-Spread Chocolate Sugar Cookie Dough recipe as your base. This dough is thoughtfully crafted so you don’t have to worry about the cookies running into each other while baking. It’s firm yet pliable, making the entire process smooth and enjoyable.
Step 2: Ready Your Workspace
Line a large baking sheet with parchment paper or baking paper to ensure the cookies bake evenly and come off easily. Preparing your surface in advance is always a smart move when working with delicate dough.
Step 3: Roll the Dough Evenly
On a lightly floured surface, gently roll out the dough to just under a quarter-inch thickness. Use some extra flour if the dough starts sticking, but be careful not to add too much—you want the dough to stay tender while holding firm shapes.
Step 4: Cut Cookies and Re-Roll Scraps
Grab your 2-inch heart-shaped cookie cutters and stamp out as many cookies as you can. Place them spaced 1 to 2 inches apart on your baking sheet. Don’t forget to gather the dough scraps and re-roll them—this is a no-waste type of recipe!
Step 5: Stamp Your Cookies
Organize your letter stamps and dip each embosser into flour or cocoa powder, then tap off the excess. Press gently on each cookie to imprint clear letters without pushing through the dough. This personalized touch makes these cookies perfect for gifting or special occasions.
Step 6: Chill Before Baking
Refrigerate the stamped cookies for one hour. This chilling step is key to helping your cookies keep their shape during baking and develop a tender texture.
Step 7: Bake to Perfection
Preheat your oven to 350 degrees Fahrenheit and bake the cookies on the middle rack for about 12 minutes. Keep an eye on them—adjust the time slightly if your cookies are a bit bigger or smaller. You want the edges set but the centers still soft.
Step 8: Cool and Transfer
Let the cookies cool on the baking sheet for five minutes so they firm up a bit, then carefully move them to a wire rack to cool completely. This helps prevent breakage and ensures they stay crisp where you want them.
Step 9: Brush on Icing
While the cookies are still warm, whisk powdered sugar with cream of tartar, salt, vanilla, and milk until smooth and glossy. Use a pastry brush to lightly coat each cookie, paying extra attention to the embossed letters so they stand out beautifully.
Step 10: Let Icing Set
Allow the cookies to cool and the icing to dry fully before storing. This finishing touch adds a delicate sweetness and a little shine that makes these cookies truly irresistible.
How to Serve No-Spread Chocolate Sugar Cookie Dough Recipe
Garnishes
Though these cookies shine on their own, adding a sprinkle of finely chopped toasted nuts, a dusting of cocoa powder, or a few colorful sugar crystals over the icing can elevate their presentation and offer a new layer of texture and flavor.
Side Dishes
Pair these chocolate sugar cookies with a simple glass of cold milk or a warm cup of coffee or tea for a classic combo. Fresh fruit like raspberries or oranges can add a refreshing contrast to the richness, making every bite even more enjoyable.
Creative Ways to Present
Think beyond a cookie plate: arrange your No-Spread Chocolate Sugar Cookie Dough Recipe cookies in pretty gift boxes, tie bundles with festive ribbons, or even use them as edible place cards for parties by stamping guests’ names. They make any occasion feel extra special.
Make Ahead and Storage
Storing Leftovers
Store your baked and iced cookies in an airtight container at room temperature for up to one week. Layer them carefully with parchment paper to prevent sticking or damage to the icing and embossed designs.
Freezing
You can freeze both unbaked dough and baked cookies. Wrap the dough tightly in plastic and freeze for up to a month; thaw overnight in the fridge before rolling and cutting. For baked cookies, freeze in a sealed container with layers of parchment for up to three months, letting them thaw at room temperature when ready to enjoy.
Reheating
If you want to revive that freshly baked taste, warm the cookies gently in a 300-degree oven for 5-7 minutes. Avoid the microwave as it can make them chewy or soggy and dull the icing’s shine.
FAQs
Why doesn’t this cookie dough spread during baking?
The clever combination of cream of tartar and controlled moisture in this dough helps it keep its shape by stabilizing the structure and preventing the fat from melting too quickly in the oven.
Can I make this recipe gluten-free?
Yes, substituting the flour with a blend of gluten-free flours designed for baking can work well, but be sure to check that your other ingredients like baking powder are also gluten-free for best results.
Is it possible to use this dough for other cookie shapes?
Absolutely! While hearts are charming, this dough is flexible enough to handle any shape you like, from classic circles to seasonal motifs. Just keep the thickness consistent to bake evenly.
Can I skip the icing step?
You can, especially if you prefer a simpler cookie. The dough is delicious on its own, but the icing adds a sweet, elegant finish that complements the chocolate and highlights the embossed designs.
How long should I chill the dough before baking?
The recipe calls for chilling the cut cookies for one hour, which is essential to prevent spreading. You can chill longer if desired, even overnight, to develop even more flavor and firmer cookies.
Final Thoughts
This No-Spread Chocolate Sugar Cookie Dough Recipe has quickly become one of my absolute favorites for when I want perfectly shaped, wonderfully chocolaty cookies that are as fun to decorate as they are to eat. Give it a try and watch how easily this recipe wins hearts at your next gathering or cozy night in. You’ll love how simple ingredients turn into a show-stopping treat!
Print
No-Spread Chocolate Sugar Cookie Dough Recipe
- Prep Time: 20 minutes
- Cook Time: 12 minutes
- Total Time: 1 hour 42 minutes
- Yield: 24 cookies
- Category: Dessert
- Method: Baking
- Cuisine: American
Description
These No-Spread Chocolate Sugar Cookies are delightful, perfectly shaped treats that hold their form without spreading during baking. Using a rich chocolate cookie dough, the cookies are rolled thin, cut with heart-shaped cutters, and personalized with letter embossers before chilling and baking. Finished with a smooth vanilla glaze brushed into embossed letters, these cookies are ideal for festive occasions or gifting.
Ingredients
Cookie Dough
- 1/2 recipe No-Spread Chocolate Sugar Cookie Dough
Glaze
- 1 cup powdered sugar
- 1/4 tsp cream of tartar
- 1/8 tsp coarse Kosher salt
- 1/2 tsp vanilla extract
- 2 1/2 – 3 tbsp milk
Instructions
- Make Dough: Prepare 1/2 recipe of the no-spread chocolate sugar cookie dough as directed in the base recipe.
- Prepare Baking Sheet: Line a large baking sheet with parchment paper or baking paper to prevent sticking and ensure even baking.
- Roll Dough: On a lightly floured surface, roll out the dough evenly to just under 1/4 inch thickness, using additional flour as needed to prevent sticking.
- Cut Cookies: Use 2-inch heart-shaped cookie cutters to cut out cookies. Place them spaced 1-2 inches apart on the prepared baking sheet. Gather dough scraps, re-roll and repeat cutting until all dough is used.
- Stamp Cookies: Organize your letter stamps for desired words. Lightly dust embossers with flour or cocoa powder and tap off excess. Press firmly on each cookie to imprint letters without going through to the other side.
- Chill Dough: Refrigerate the baking sheet with cut and stamped cookies for 1 hour to firm up the dough and maintain shape during baking.
- Preheat Oven: Set oven to 350°F (175°C) and position a rack in the center.
- Bake: Bake cookies for approximately 12 minutes. Adjust time if cookies are larger or smaller, until edges are set but centers remain slightly soft.
- Cool Cookies: Let cookies cool on the baking sheet for 5 minutes, then carefully transfer to a wire rack to cool completely.
- Prepare Glaze: While warm, whisk together powdered sugar, cream of tartar, salt, vanilla extract, and 2 1/2 to 3 tablespoons milk until smooth and slightly runny.
- Glaze Cookies: Use a pastry brush to apply a thin layer of glaze over the cookies, ensuring the embossed letters are well covered for a clear, attractive finish.
- Finish and Store: Allow cookies to cool and dry thoroughly before storing in an airtight container to preserve freshness.
Notes
- Ensure the dough is chilled before rolling to minimize spreading.
- Use just enough flour when rolling and stamping to avoid sticky dough but prevent flour excess which can affect cookie texture.
- Letter embossers should be lightly dusted to prevent sticking and to leave clear impressions.
- The glaze helps highlight the embossed letters and adds a sweet finishing touch.
- Store cookies in a cool, dry place in an airtight container for up to one week.


