

If you’re longing for a nostalgic treat that brings back warm memories and delights every bite, look no further than this Old-Fashioned Pink Jelly Cake Recipe. This charming classic combines soft, fluffy sponge with a glossy pink jelly coating and a snowy coconut crust, all sandwiched with luscious whipped cream. The result is a showstopper dessert that’s as fun to make as it is to eat, bursting with vibrant color and a perfect balance of textures. Whether for a potluck, afternoon tea, or simply a sweet indulgence, this cake will instantly transport you to a cozy kitchen filled with happiness.
Ingredients You’ll Need
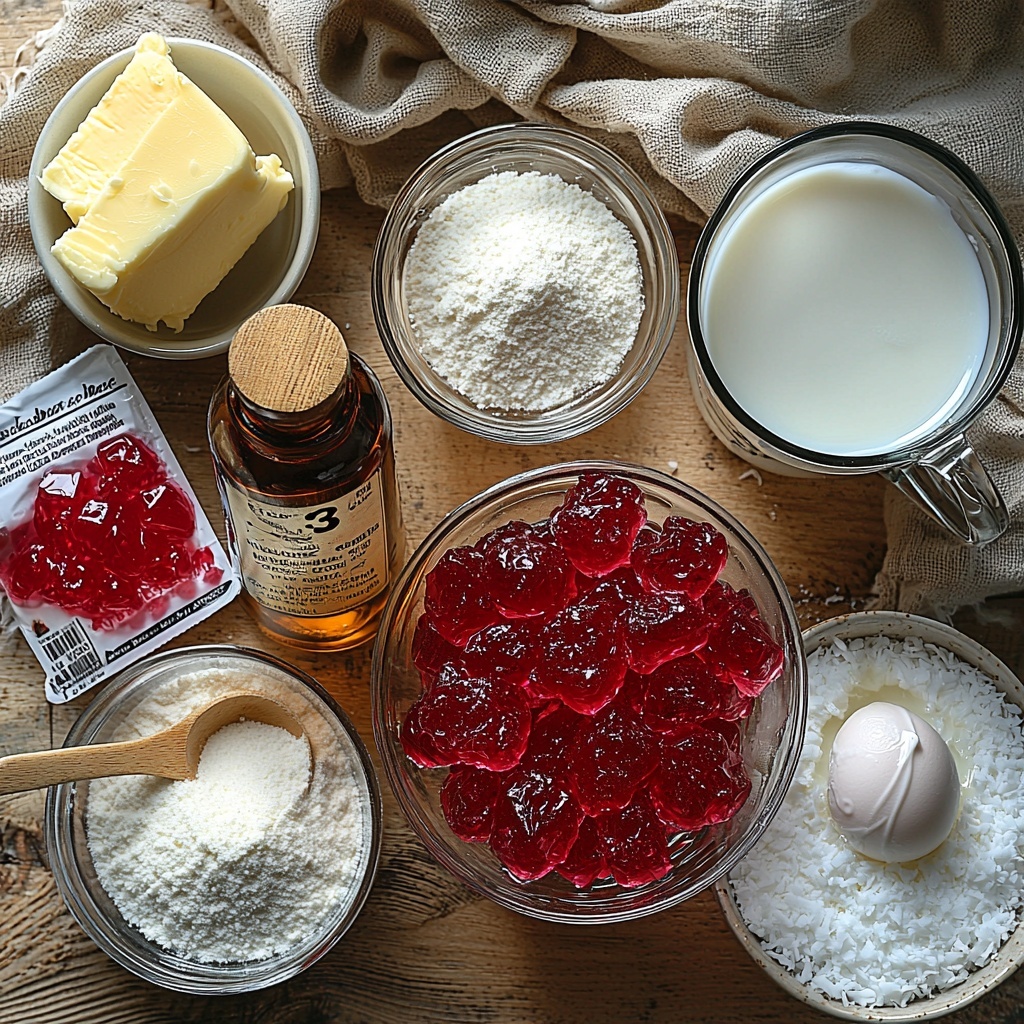
Gathering your ingredients for this cake is wonderfully straightforward, but each one plays a key role in crafting the perfect pink jelly cake. The butter and sugar create a tender crumb, the jelly crystals infuse the irresistible pink hue and flavor, and the coconut adds a delightful chewiness that contrasts beautifully with the soft sponge.
- Butter (80g, softened): Ensures a rich, moist texture in the cake base.
- Caster sugar (1/2 cup, 110g): Adds sweetness and helps achieve a fluffy cream when beaten with butter.
- Vanilla extract (1 tsp): Brings a warm aromatic note that complements the strawberry jelly perfectly.
- Egg (1): Binds the ingredients and contributes to the cake’s light structure.
- Milk (2/3 cup, 160g): Softens the batter and keeps the cake tender.
- Self-raising flour (1 cup, 130g, sifted): Provides the necessary lift and sponge-like crumb.
- Strawberry jelly crystals (85g packet): The star ingredient delivering that signature pink color and fruity flavor.
- Boiling water (1 cup, 240g): Dissolves the jelly crystals quickly for even setting.
- Cold water (1 cup, 240g): Adds volume to the jelly mixture and helps it set to the perfect consistency.
- Desiccated coconut (3 1/2 cups, 280g): Creates a textured outer coating that adds chew and contrasts the smooth jelly.
- Whipped cream (1 cup, 240g): Acts as the luscious filling that balances sweetness and richness.
How to Make Old-Fashioned Pink Jelly Cake Recipe
Step 1: Prepare and Cream
Start by preheating your oven to 175°C, fan-forced. Lightly grease two 12-hole patty-pan tins to ensure your cakes pop out easily after baking. In a generous mixing bowl, cream together the softened butter, caster sugar, and vanilla extract until the mixture is pale and fluffy — this is where the magic begins as you create the base for a tender, moist cake.
Step 2: Add Egg and Dry Ingredients
Beat in the egg until it’s fully incorporated, bringing everything together into a smooth mixture. Then, alternately fold in the milk and sifted self-raising flour in two batches to keep the batter light and aerated, ensuring your cakes rise beautifully and have that classic soft crumb.
Step 3: Bake the Cakes
Spoon the batter evenly into the prepared patty-pan holes, filling each just below the top so there’s space for rising without overflow. Bake for 15 to 18 minutes or until the cakes turn a tender golden hue and a skewer inserted comes out clean. Allow the cakes to cool in the tins for 5 minutes before transferring to a wire rack to cool completely — patience will pay off with perfect texture!
Step 4: Prepare the Jelly
Dissolve the strawberry jelly crystals in boiling water, stirring until completely dissolved, then mix in the cold water. Pop the mixture into the fridge and chill for 1 to 2 hours, until it’s partially set — thick enough to coat but not fully firm, offering the best sticky texture for dipping.
Step 5: Coat Cakes and Assemble
Carefully dip each cooled cake into the jelly using a slotted spoon, allowing excess jelly to drip off so it clings in a wonderfully glossy layer. Roll each jelly-coated cake generously in desiccated coconut, creating a snowy, textured outer covering. Finally, take one half and spoon a dollop of whipped cream over it, then sandwich with another half to complete your pink jelly cake. Refrigerate the assembled cakes for 30 minutes to let everything set beautifully.
How to Serve Old-Fashioned Pink Jelly Cake Recipe
Garnishes
Adding fresh, complementary garnishes elevates your Old-Fashioned Pink Jelly Cake Recipe perfectly. Think of a few fresh strawberries or a sprig of mint on top for some added brightness. A light dusting of icing sugar can add a romantic, delicate finishing touch that makes each serving feel extra special.
Side Dishes
This cake pairs wonderfully with light accompaniments like a bowl of fresh berries or a simple fruit salad, which cut through the richness and complement the strawberry flavor. For a mid-afternoon treat, consider serving it alongside a cup of freshly brewed tea or a refreshing lemonade for a truly delightful break.
Creative Ways to Present
For a fun twist on the classic, try stacking several jelly cakes to create mini-tiered cakes secured with a skewer, perfect for celebrations. Alternatively, serve them on colorful vintage plates to embrace the nostalgic vibe fully. Wrapping each cake in a decorative paper cup or cellophane bag also makes for lovely party favors that guests will adore.
Make Ahead and Storage
Storing Leftovers
Your Old-Fashioned Pink Jelly Cake Recipe leftovers should be stored in an airtight container in the refrigerator to preserve freshness and prevent the jelly from drying out. These cakes stay delicious for up to 2 days, making them an easy choice for preparing in advance.
Freezing
Freezing these cakes is possible but not ideal due to the jelly and whipped cream layers. If you must freeze, wrap them individually in plastic wrap and aluminum foil, then store in a freezer-safe container. Thaw overnight in the fridge to minimize texture loss; however, fresh is always best for that classic experience.
Reheating
Because this cake is served chilled and features jelly and cream, reheating is not recommended. Instead, enjoy it straight from the fridge where its textures and flavors are at their prime, delivering that true Old-Fashioned Pink Jelly Cake Recipe magic.
FAQs
Can I use different jelly flavors in this recipe?
Absolutely! While strawberry is traditional and offers that iconic pink color, feel free to experiment with raspberry or cherry jelly crystals for varying flavors and shades. Just keep in mind some flavors may alter the classic look of the cake.
Is there a way to make this recipe gluten-free?
Yes, you can substitute the self-raising flour with a gluten-free self-raising blend. Be sure to sift it well and check the packet instructions to ensure proper rising. The texture might be slightly different but still delicious.
Can I prepare the jelly the night before?
It’s best to prepare the jelly so it is partially set when you dip the cakes. You can make it the night before, then bring it to the desired consistency by refrigerating it just long enough before dipping.
What’s the best way to whip the cream for this cake?
Use chilled cream and beat it with a whisk or electric mixer until soft peaks form. Avoid overwhipping to prevent turning it into butter. The cream should be light and fluffy to complement the jelly cake nicely.
Can I make this cake in one larger cake pan instead of patty pans?
This recipe is designed to make individual cakes, which hold their shape and allow for perfect jelly coating and rolling in coconut. Using a larger pan will change the texture and presentation, so for the authentic experience, stick to patty pans.
Final Thoughts
There’s something truly special about the Old-Fashioned Pink Jelly Cake Recipe that makes it a timeless crowd-pleaser. Its blend of nostalgic charm with vivid pink jelly, coconut, and fluffy cream is a joyful celebration on a plate. I wholeheartedly encourage you to give this recipe a try — it’s simple, fun, and will undoubtedly become a cherished favorite in your own kitchen traditions!
Print
Old-Fashioned Pink Jelly Cake Recipe
- Prep Time: 15 minutes
- Cook Time: 18 minutes
- Total Time: 1 hour 30 minutes
- Yield: 12 servings
- Category: Dessert
- Method: Baking
- Cuisine: Australian
Description
This Old-Fashioned Pink Jelly Cake is a nostalgic Australian treat featuring light, buttery sponge cakes dipped in a wobbly strawberry jelly and rolled in desiccated coconut. The jelly adds a sweet, fruity layer, while the whipped cream sandwich creates a soft, creamy finish. Perfect for afternoon tea or a fun dessert, these individual cakes combine texture and flavor in a delightful, colorful presentation.
Ingredients
Cake Batter
- 80g butter, softened
- 1/2 cup (110g) caster sugar
- 1 tsp vanilla extract
- 1 egg
- 2/3 cup (160g) milk
- 1 cup (130g) self-raising flour, sifted
Jelly Coating
- 85g packet strawberry jelly crystals
- 1 cup (240g) boiling water
- 1 cup (240g) cold water
- 3 1/2 cups (280g) desiccated coconut
Assembly
- 1 cup (240g) whipped cream
Instructions
- Preheat oven: Preheat your oven to 175°C (fan-forced) to ensure it reaches the correct temperature for baking the cakes evenly.
- Prepare tins: Lightly grease two 12-hole patty-pan tins to prevent the cakes from sticking and allow for easy removal after baking.
- Cream butter and sugar: In a large bowl, cream together the softened butter, caster sugar, and vanilla extract until the mixture is pale and fluffy, which helps create a light texture in the cakes.
- Add egg: Beat in the egg until fully incorporated, ensuring the batter is smooth and well mixed.
- Fold in milk and flour: Gently fold in the milk and sifted self-raising flour alternately in two batches. This careful folding keeps the batter light and prevents it from becoming dense.
- Fill tins: Spoon the batter into the prepared patty-pan holes, filling each just below the top to allow room for rising.
- Bake cakes: Bake in the preheated oven for 15–18 minutes or until the cakes are golden and a skewer inserted into the center comes out clean, confirming they are cooked through.
- Cool cakes: Allow the cakes to cool in the tin for 5 minutes to firm up slightly, then transfer to a wire rack to cool completely, preventing them from becoming soggy.
- Dissolve jelly crystals: Dissolve the strawberry jelly crystals in boiling water, stir in the cold water, and refrigerate until partially set (about 1–2 hours). This creates a thick jelly coating to dip the cakes into.
- Dip cakes in jelly: Dip each cooled cake into the jelly mixture using a slotted spoon, letting excess jelly drip off. The jelly will coat the outside and set a fruity glaze.
- Roll in coconut: Roll the jelly-coated cakes in desiccated coconut, adding texture and a lovely flavor contrast.
- Assemble cakes: Spoon the whipped cream onto one half of a cake and sandwich with another half to create a creamy filling inside each cake.
- Chill before serving: Refrigerate the assembled cakes for 30 minutes before serving to allow the jelly to fully set and the flavors to meld.
Notes
- Ensure the jelly mixture is partially set, not fully firm, before dipping the cakes for the best coating.
- Use fresh whipped cream for the best flavor and texture; store-bought cream can also work if preferred.
- These cakes are best served chilled and consumed within 2 days for freshness.
- Patty-pan tins can be substituted with standard muffin pans, but the cooking time may vary slightly.
- For a fun variation, try using other flavored jelly crystals such as raspberry or lime.


